 The
American Self Protection Association, Inc.
The
American Self Protection Association, Inc.
Home of America's first Mixed Martial Art Training Method for the Entire Family
Kicks
![]()
![]()
![]()
![]()
|
Home of America's first Mixed Martial Art Training Method for the Entire Family Kicks
|
|
8.0 Kicking - In Place Mastering kicking techniques requires excellent balance, a good sense of the distance and of the direction in which your target is moving, a good sense on timing and, above all, speed. While it is true that kicks are the most powerful blows you can deliver, it is also true that the feet are considerably slower than the hands. Furthermore, standing on one foot when delivering a kick makes for a rather precarious balance. It is quite clear then that one must deliver a kick with the utmost speed of which one is capable, so as to remove oneself from this vulnerable position as soon as possible. Another reason for delivering a kick fast and withdrawing the attacking leg even faster, is to avoid getting your leg caught. We will study ten different varieties of kicks, described in order of increasing difficulty. The mastery of the first five basic kicks can be achieved with moderate practice, and will give you much confidence. Knowledge of these kicks is amply sufficient in order to start free sparring. The study of the side-of-foot, instep and circular kicks is facilitated by the use of the isometric principle, as will be described further. When kicking, the heel and sole of the standing foot must be in firm contact with the floor. Try as much as possible keep the body close to the vertical; leaning away from it tends to impair your balance as well as the power of your kicks. There are, however, some exceptions. In order to develop powerful punches and kicks you must first learn to punch and kick in full balance. Kicks practiced in slow motion are excellent for developing balance control. As your balance improves, increase speed accordingly. When you can kick very fast in full balance, strive for accuracy, first on stationary and then on moving targets. Finally, strive for power with penetration by impact shock concentration on the target and rapid withdrawal of the attacking limb. Practice all techniques completely and fully, do not cut corners under the pretext of speed. Do not underestimate your mental attitude: it is by far the most important attribute of success. Practice consistently in a relaxed way, with tenacity and without any anxiety. No matter whether you feel you are progressing or not, keep doggedly at it. Results will surely follow. Before describing the kicks proper we would like to comment on the footwear appropriate to kickboxing. One may train barefoot, or with ankle high tennis shoes. The best footwear, however, is soft leather boxing shoes, or moccasins providing ankle support. In competition, opponents may choose, upon mutual accord, the footwear of their liking. In case of disagreement, however, soft leather boxing shoes must be worn. All kicks are described from the left Full-Distance B.T.S. 8.1 LOW DIRECT KICK The preferred kicking foot is the rear one and the specific target aimed at is the shinbone; it is easy to reach and offers a large vulnerable area. It may be attacked either straight forward, or preferably, slightly on the inside. The front, or either front sides of the foot may be used to kick. Thrust rear (right) foot held in extension in the direction of the opponent's lower shinbone. As in all attacks, follow the general rule of aiming somewhat beyond the target and letting it come in the way. The low direct kick is delivered with a sweeping motion of the leg and a snap of the knee which remain relatively relaxed. Toes are turning up at the moment of impact. The sweeping motion of the attacking leg starts from the hips with a slight twisting action, so as to squarely face the target. The supporting leg is slightly bent, foot firmly anchored on the floor. At delivery, the body should be straight from head to ankle. In this case, we are deviating from the vertical because of our attempt to reach a low target and we want to put our face out of our opponent's reach. Since the body squarely faces opponent and, therefore, is rather vulnerable, the arms are folded in front of the chest ready to parry any attack to the upper or lower part of the body. Key Points Keep body in straight line and out of the reach of opponent's arms. Do not lift shoulders. Deliver kick with full extension of the leg, muscles totally tensed as the foot reaches its target. Return fast to starting position relaxing leg after delivery and reversing sequence.
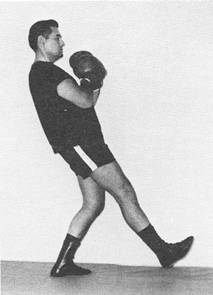
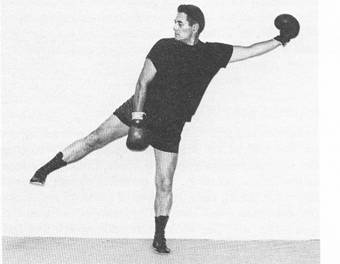
Left B.T.S. Low Direct Kick High Direct Kick 8.2 HIGH DIRECT KICK Twist hips slightly to the left, in order to face squarely the target, and fold arms in front of chest as above. Bend rear (right) knee fully and raise it as high as you can. The closer to the body you bring the attacking (right) leg, the faster and more powerful the kick. Bend slightly knee of supporting (left) leg, keeping muscles tensed and the sole in firm contact with the floor. Deliver kick with a snap of the lower part of the attacking (right) leg, keeping toes turned up. Return fast to initial position by first bending the kicking leg, then lowering it, so as not to disturb your balance. Key Points Raise kicking leg as high as possible. Knee must be fully bent, shin near the vertical, ball of the foot higher than the heel which is pulled back as much as possible. Keep knee and lower part of attacking leg relatively relaxed and line up knee and toes with the target. Deliver hick with full extension of the leg, muscles tensing completely upon impact. Return fast to starting position by relaxing leg after delivery and reversing sequence. Upon returning to the starting position make sure to first bend the knee in order to bring back the kicking leg before lowering it. Note: Both the low and the high direct kicks may be delivered with the forward foot by shifting the weight to the rear (right) foot and following the same directions. It is preferable, however, to deliver these kicks with the rear foot because one can thus gather more momentum and, therefore, develop more power. 8.3 SIDE-OF-FOOT KICK From the left B.T.S. twist hips to the left and pivot on the ball of the left foot a quarter turn so that the toes point squarely to the left. Leave right foot in the initial position, toes pointing ahead, heel off the floor. Bring right forearm in front of the chest, fist protecting the heart. Left arm is bent and in one plane with the shoulders, nails of left fist facing you. Keep elbows close to body. Look through the opponent's middle chest over your right shoulder. This is known as the "gunsight" position. Now lift the right thigh to a near horizontal position bending the knee and sliding lightly the right foot against the supporting (left) calf. This is the ready position, at which the plane of the attacking (right) bent knee is perpendicular to the plane of the hips. The edge of the attacking (right) foot is parallel to the floor and its sole is in front and close to the supporting (left) knee. Toes are curled, either up, or down, either position being valid. Kick with a swift pumping action, making contact with the edge of the foot near the heel. Deliver simultaneously in the direction opposite to the kick a strong punch with the left fist, palm facing up. Return fast to the starting position by exactly reversing instructions, taking care to first bring the kicking (right) leg back before lowering it. Follow this as a general rule, since it tends to reduce the vulnerability of your position. Key Points The following apply to the side-of-foot, instep and circular kicks for which the isometric punch is used. This is a punch thrown in the opposite direction of the kick, which tends to offset the weight and thrust of the kicking leg. It should be regarded only as a training method which helps beginners to develop a sense of balance and to improve their coordination. It does not necessarily apply to competition where other factors intervene. Twist hips to the left and make sure to align the hip corresponding to the attacking foot (right) with the target. Since you see it over the right shoulder and the right bent arm, we call this the "gunsight" position. It is important for developing accuracy and supple hips. Take it correctly, twisting the hips fully. Punch, extending the left arm fully in coordination with the kicking action. Think of actually punching someone behind you, for better application of the isometric principle. The right fist, not used for punching, either stays in front of the heart, or drops in front of the groin in order to protect it. Again, the action of the arms and the legs is geared to improve balance and develop coordination. Initiate all kicks from the hips, which should be pushed out in the direction of the kick. Just as you push the hips out during the delivery of a kick, make sure to retract them as the leg is pulled back. The importance of hip action, of their suppleness and of strong abdominal muscles for smooth and continuous performance, cannot be overemphasized. Keep body as close to the vertical as you can. If anything, lean in the direction of the kick. This will help you to keep your balance at the moment of impact. Supporting leg must be flexed (except for the circular kick) in order to cushion the impact. SIDE-OF-FOOT KICK 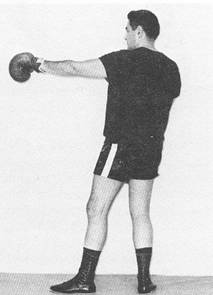 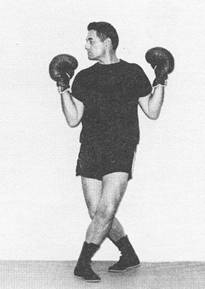 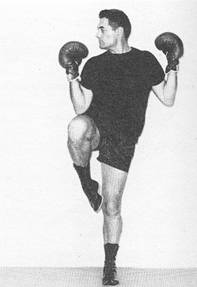
Left Full-Distance B.T.S. Gunsight" Position "Ready " Position
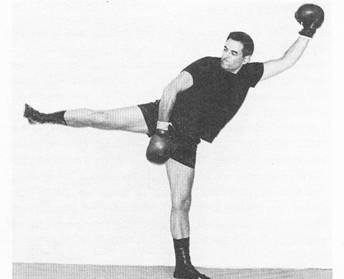
"Delivery" Position, Front View 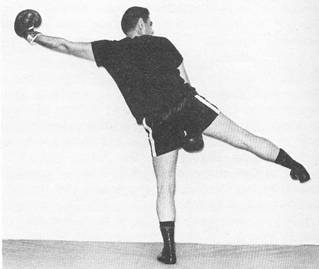 "Delivery" Position, Rear View The sole of the supporting foot is in full contact with the floor, for maximum supporting area. Knee and lower attacking leg must be relatively relaxed for a swift and light start. Tense leg, foot and ankle muscles upon impact, then pull back as swiftly as you can, relaxing again the lower leg. Practice these kicks with particular care against stationary and moving targets, since judging the distance correctly and timing the impact with the full extension of the foot is crucial for developing maximum power. Note: The side-of-foot, instep and circular kicks may also be delivered with the forward (left) foot from the left B.T.S. as follows: Pivot a quarter turn to the right, so that both feet point to the right and the left hip is lined up with the target. Kick with left foot in exactly the same manner as described for the right. After delivering the kick return quickly to the left B.T.S. 8.4 INSTEP KICK This kick is delivered with the instep in a whip-like upward motion, foot in complete extension. It is specifically used for attacks to the lower abdomen and to the groin. Generally speaking, it will cause only moderate damage because it is delivered with a relatively large area of the foot. The instep kick may be delivered from almost any position, either with the rear or forward foot. In self-defensive situations, it may be used either as a warning for further action, or as a means to create an opening for a more powerful attack in a less sensitive area. Since the instep kick must be delivered particularly fast, it is well suited for catching an opponent off guard in the preparation of his attack. INSTEP KICK 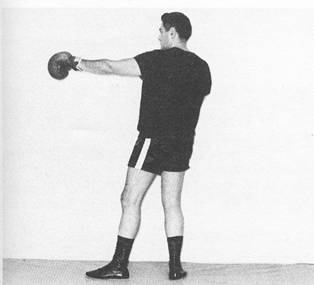 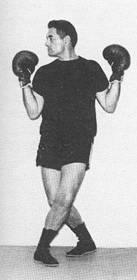
Left Full-Distance B.T.S. "Gunsight" Position 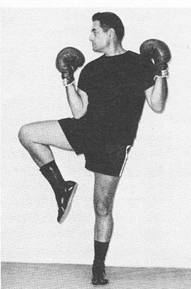 "Ready" Position  Instep Kick "Delivery" Position Key Points Same as for the side-of-foot kick, plus the following: At the ready position, before delivering the kick, the body and the attacking leg are in one plane, knee pointing to the target. Keep knee of attacking leg relaxed. Tense foot concentrating all your power on the instep at moment of impact. Again, push the hips in the direction of the kick. CIRCULAR KICK 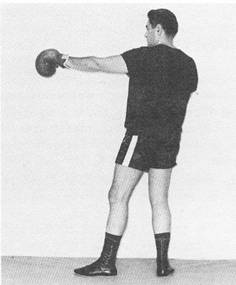 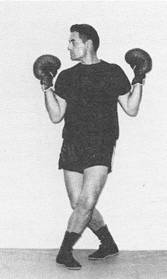 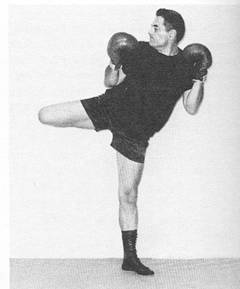 Left Full-Distance B.T.S. "Gunsight" Position "Ready" Position
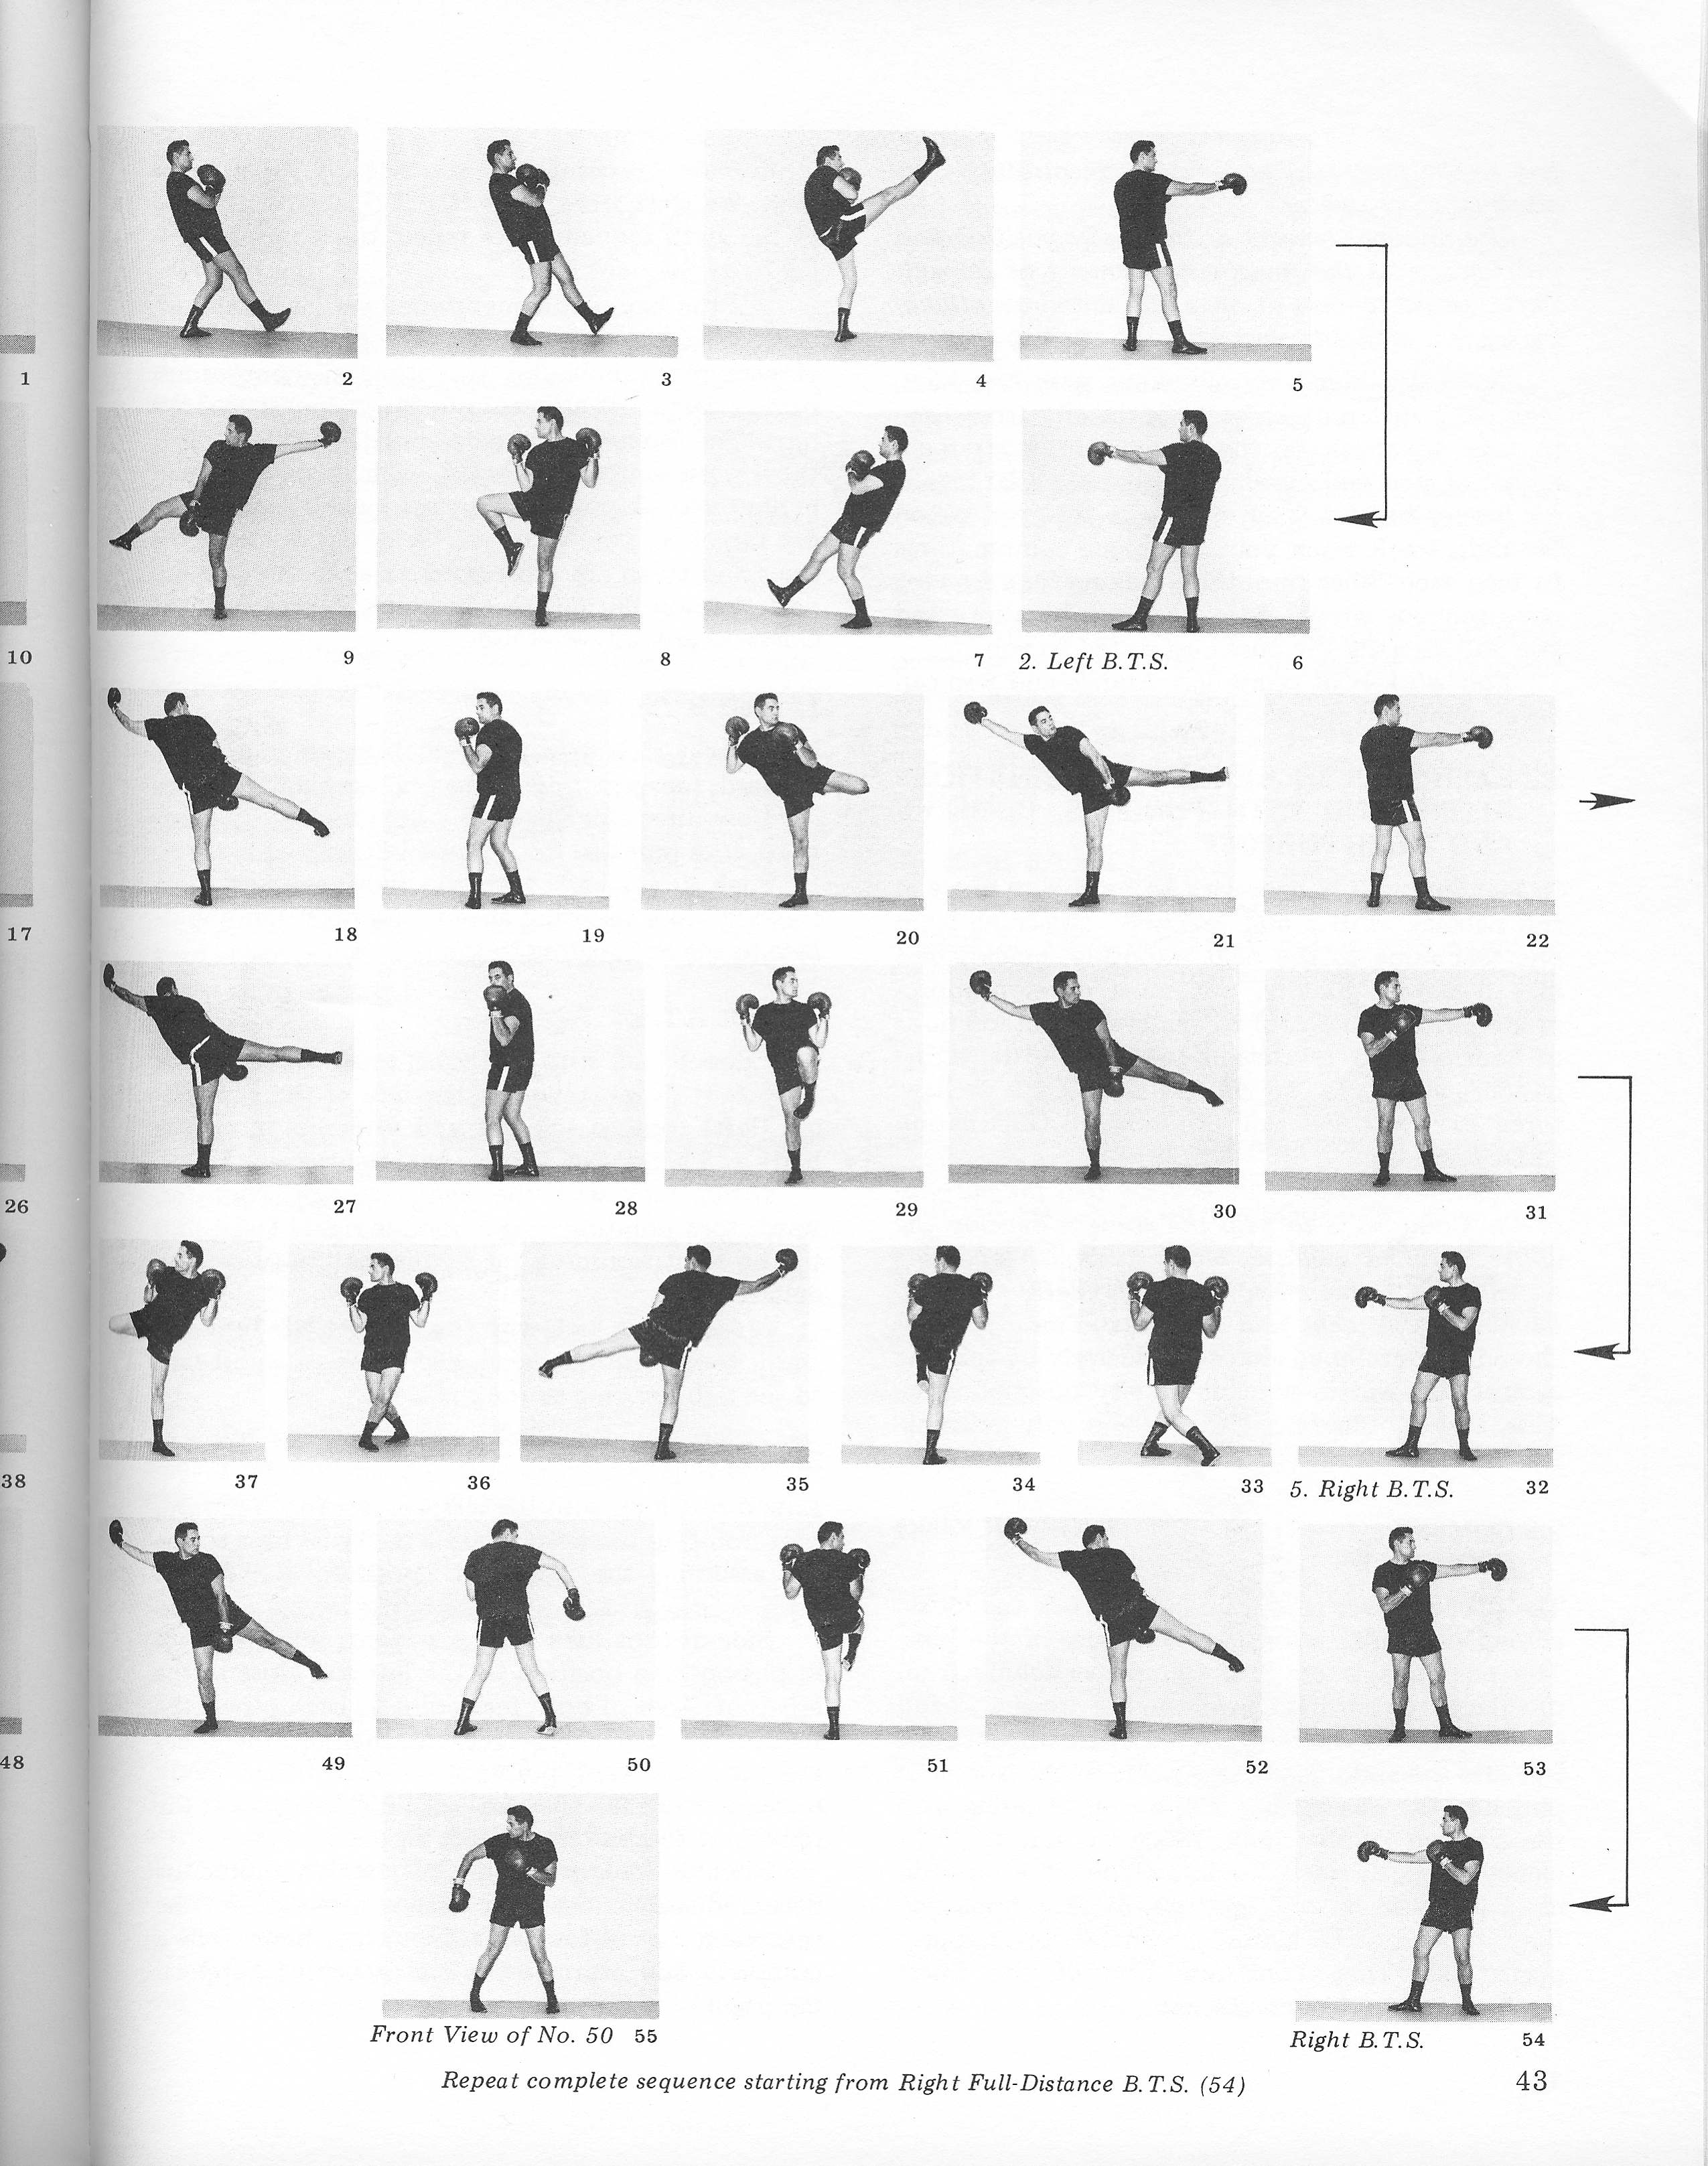
"Delivery "Position 8.5 CIRCULAR KICK From the left B.T.S., get into the "gunsight" position as usual. Raise right knee fully bent so that the leg is in a plane almost parallel to the floor, heel close to the right buttock. Curl up toes and deliver the kick with a smooth circular motion, using the isometric punch. Key Points Get into the "gunsight" position as described for the side of foot kick and line up the right hip with the target. Lift right knee as high as you can, shin forming approximately a 45° angle with the thigh of the supporting (left) leg. Attacking foot is bent at the ankle, toes in full extension, pointing down to the oblique left and close to the supporting leg, at knee level. Deliver kick with the instep in a snappy upward motion using the isometric punch as previously described. Return fast to the left B.T.S. taking care to retract the attacking leg first before lowering it. Same as for side-of-foot kick, plus the following: Do not overshoot kick much beyond the plane of your body, else you will lose balance. Time well the isometric punch with the moment of impact. Take particular care to push the hips out in the direction of the kick, as this is more important for the circular kick than for any other. Supporting (left) leg must be in full extension at the ready position, contrary to the side-of-foot and instep kicks. Stretch and keep body near vertical, while the foot is firmly anchored to the floor. This concludes the last of the five basic kicks. They are not particularly hard to master and they are amply sufficient for worthwhile sparring. However, they require systematic practice. Further considerations on our approach to training will be given in the Appendix on self-defense. The following kicks, although not absolutely necessary for an initiation to the sport of kickboxing, are very useful in self-defense. 8.6 HEEL SPEAR This is an attack to the rear using the heel as the striking area. From the left B.T.S., drop the right arm in front of the groin, bring the left hand in front of the heart and turn the head to the right, looking at the target over the right shoulder. Raise the right knee to the chest and bend the right ankle upward. Lining up the right hip and shoulder with the target, thrust sharply the heel in its direction. This kick utilizes the backward swing of the thigh and the snap of the knee. Withdraw the right leg fast and pivoting to the right on the left foot, assume now a right B.T.S. facing opponent. Key Points Supporting left foot is flat on the floor, in line with the thrust. Supporting knee is slightly more bent than in the high direct kick. Lean away from the direction of the kick only as necessary: overdoing it will impair its power and your balance. Kick in line with the body, not diagonally to it. Withdraw kicking leg fast and pivot at once to face opponent. HEEL, SPEAR 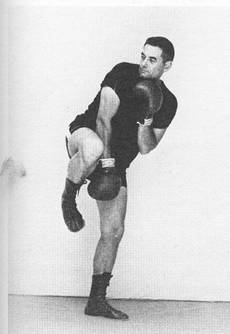 "Ready " Position" 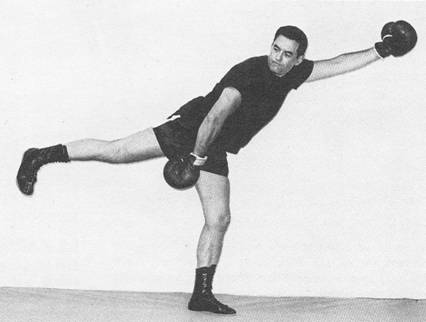 Delivery " Position 8.7 HEEL HOOK In contrast to the previous technique, which utilizes the bottom of the heel, this one makes use of the back of the heel right below the Achilles tendon. Lift forward (left) leg to the oblique forward right, knee slightly bent and toes in extension. Leg remains loose. Arms are positioned as follows: Right arm is bent in line with the body, nails of right fist facing performer, while left fist is in front of the heart, left elbow protecting the left side. Bend left knee and deliver kick with a whipping circular motion to the left. Return fast to the left B.T.S. facing opponent. You may also deliver this kick with the rear (right) foot as follows: Pivot to the left on left foot and lift the right while reversing the position of the arms. Bring the right leg in front of the left, in an oblique leftward direction. Right leg is kept loose. Lift and bend it sufficiently to gather momentum delivering the kick with a circular whipping motion to the right. Pull leg back fast and return to the left B.T.S. Note that the isometric punch need not be used here. Key Points Supporting leg is kept straight. Avoid bending the knee. Attacking leg should bend enough for the whipping action with which this kick is delivered, but no more than about 90°. This kick must be delivered in line with the body. Avoid letting the momentum of the kick carry you further, since this will impair your balance and give an opening to your opponent. Heel hooks are mostly used to deflect and parry other kicks, while scoring against opponent as stopkicks and counters. HEEL HOOK-Front Foot Delivery  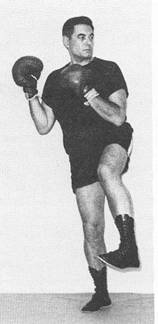 Left Full-Distance B.T.S. Ready" Position 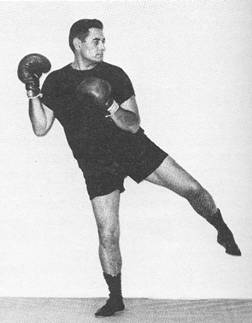 "Delivery" Position HEEL HOOK - Rear Foot Delivery 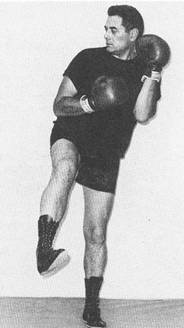 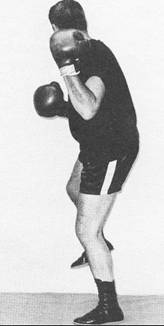 Preparation Ready Position 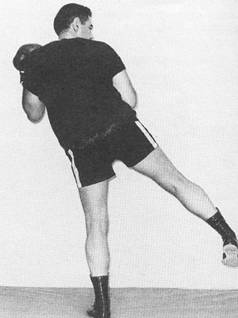 Delivery Position 8.8 JUMPING KICKS* The jumping kicks used in kickboxing allow you to attack from considerable distance. Do not let the name frighten you: these kicks do not require acrobatic capabilities. * See Comsek I for illustration. To perform a jumping kick from the left B.T.S., jump forward, landing on your right foot, toes pointed in, as far as they can go. Then jump again exchanging supporting foot, i.e., bringing your left foot where the right foot was. At the same time, cock the right leg as in the side or circular kick "ready" position described earlier and kick your selected target using the momentum you have gathered during the jump. Arms take the same position as for the corresponding kicks. 8.9 ROLLING KICK Although this kick is rarely used in competition, it is extremely efficacious in self-defense and, furthermore, since it is part of the Comseks (kicking combination sequences) we are describing it here. The best time to deliver a rolling kick is after a jumping dodge when your opponent pivots to face your new position, which is perpendicular to the direction of his initial attack. Then, for a brief interval he is open to the rolling kick. 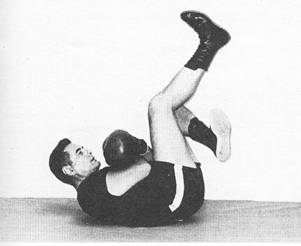 Rolling Kick From the B.T.S. take a forward step with the right foot, toes facing slightly to the left (inward) and let your body, led by a wide circular motion of the right arm, be carried into a forward right roll. The right fist points toward the oblique left and as you roll from the back of the right shoulder to the left hip. Kick with a thrusting action of the right leg performed shortly after it has passed the vertical. The kick is delivered with the bottom of the heel in a sharp thrusting action directed to the opponent's lower abdomen. Stand up taking the left B.T.S. and, if close to the opponent, pursue your attack with punches. With practice you may be even able to deliver a double kick. Key Points Line up the target and use the same technique as for a right forward rolling breakfall. Take care not to land on the tip of the right shoulder. Thrust attacking leg shortly after it has passed the vertical. Appropriate timing is crucial. Be ready for follow through with other attacks. 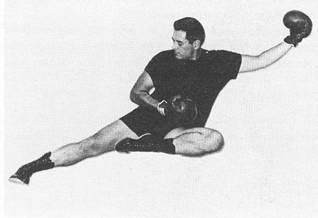 Side-of-Foot Flying Kick - "Delivery" Position 8.10 FLYING KICKS These spectacular kicks are not recommended for kickboxing competition because they are hard to control and because of the inherent vulnerability of the performer's position should he miss. They are not necessary for effective kickboxing self defense, but we consider them as excellent training exercises. It is possible to deliver flying direct and flying side-of-foot kicks. It is also possible to initiate the jump with the front foot and kick with the rear foot, or to initiate the jump with the rear foot and kick with the front foot. We describe here the flying side-of-foot kick. Start from the left B.T.S. as for a jumping kick and after your right foot has touched the floor, group both feet and jump as high as you can in the direction of the target. At the pinnacle of your trajectory, fold the left foot in front of the groin as you thrust out your right foot for a side-of-foot kick to the target. For maximum delivery power, bring the right knee as close as possible to the chest. Retract the attacking foot close to the body before landing on your toes as gently as you can. Key Points Line up your hip with the target during the initial step, else it is quite easy to miss. The initial step, together with the spring action of your hips, ankles and knees, will determine the height of your leap and its forward momentum toward the target. The strength of these joints will directly influence your ability to deliver strong and accurate flying kicks. Jump as high as you can and tense the abdominal and hip muscles when airborne. As in most kicks, do not lean back more than necessary, rather, try to lean somewhat in the direction of the kick. Make sure to bring the attacking leg close to the body before landing, in order to maintain balance and reduce your vulnerability. The ankle and foot of the attacking leg must be tensed and the knee must be briefly locked in the extended delivery position, when the other foot comes in front of the groin. Master first all other kicks before you start working on the flying kicks. 8.11 KNEEING Like elbowing, kneeing is illegal in the sport of kickboxing, but it is useful in self-defense. Direct Kneeing: Strike up and forward bending the knee sharply and let the target come in the way. Take the same position as for delivering a high direct kick. Circular Kneeing: Prepare as for a circular kick. Then, rather than thrusting the foot toward the target, swing the knee toward it in a wide circular motion, leading with the hips. Key Points Bend knee fully and tense ankle, toes in extension. Because of the proximity of the opponent, be prepared to parry an attack, or better still, break his balance before you get in for kneeing. 9.0 Kicking - In Motion In a sparring bout or in a self-defense situation blows and kicks are exchanged in a non-rehearsed sequence and it is quite obvious that one should be able to deliver at will punches and kicks intermingled with parries, dodges, counters and stop kicks in fast smooth succession. One must be able to accomplish this in full balance with accuracy and speed. The number of possible combinations is truly enormous and it becomes very easy to get lost in a morass of complicated techniques. Our task is to simplify things by working with principles and breaking down techniques into their essential elements which then can be perfected individually and put together into a simple systematic whole. With this in mind, the student can easily combine the footwork as described from the full distance B.T.S. with the kicks we have seen. He does not have to study all the possible combinations, not even a great number of them. While it is true that the more he studies the more at ease he will feel, it is better to master a small number of versatile combinations, rather than attempt to learn a great many superficially. The first step is to master the basic kick performed with basic footwork. He should then proceed with the Comseks and free style sparring, for which there is no substitute. 9.1 EXAMPLE As an example for such training, we have chosen the Low Direct kick performed with the rear (right) foot from the left B.T.S. 9.1.1 Advancing Two possibilities: a. Take a step forward, kick with the right foot, return to the B.T.S. and retreat to the starting position. b. After delivering the kick, instead of returning to the left B.T.S. place the kicking (right) foot forward and assume the right B.T.S. It is clear that where you return the kicking foot, forward or behind the supporting leg, will have a determining influence on the follow up. 9.1.2 Retreating Two possibilities also: a. Retreat first, then kick with rear (right) foot. b. Kick with the rear (right) foot, return to the left B.T.S., then retreat by sliding the left foot behind the right assuming the right B.T.S. without dropping the guard. In other words, retreat, changing stance. 9.1.3 Adjusting Distance Adjust distance with the forward (left) foot and kick and the rear (right) foot. 9.1.4 Jumping: Jump forward and kick with the rear (right) foot. Jump backwards in retreat and kick with the rear (right) foot. 9.1.5 Lateral Steps Take a lateral step and kick. Kick and take a lateral step. 9.1.6 About Face About face and kick with the rearmost foot. Keep in mind that as you about face you change B.T.S. from left to right and vice versa. Key Points Be relaxed while moving. Drain tension from shoulders and let your weight "settle" in the lower abdomen. Feel it as if it were concentrated in one point and imagine it as your center of gravity. This technique will help you to remain relaxed. Your feet should glide lightly and swiftly on the floor, but do not sacrifice accuracy of motion to speed. Increase speed only as your ability to perform correctly improves. Look straight ahead as if through the upper chest of an imaginary opponent. Calmly concentrate on the technique you are performing. You can achieve this by a negative process of elimination of anything that does not pertain to the technique at hand. Concentration is an attribute of champions. Use minimal tension at the ready position and full tension at the imaginary moment of impact. Then release tension at once and withdraw attacking leg fast without lowering it too soon. Gradually blend various steps with one kick, then with different kicks. Stop briefly from time to time to check on the accuracy of your technique, or you will develop bad habits. A large mirror is very helpful. You will know that you are on the right track when your technique combinations fit into each other smoothly, making for a flowing homogeneous whole. Try several combinations and you will discover the ones best suited to you. Footwork is of prime importance and you can never practice it too much. 9.2 EXERCISES IN KICKING COMBINATIONS ALONE AND WITH PUNCHES, COMSEKS AND THEIR PURPOSE In kickboxing it is necessary to be able to move in full balance swiftly and precisely, switching from one technique to the next smoothly, quickly and in full power. Finally, one must develop appropriate muscular control to achieve the alternations of tension and relaxation used while delivering punches and kicks. To achieve these goals we have three exercises we call Comseks, (COMbination SEQUences ). It must be clearly understood that the purpose of the Comseks is to help the student develop the above outlined qualities while studiously avoiding freezing his reflex responses to predetermined sequences of attacks and defenses. These reflexes should be developed almost exclusively by sparring against the widest possible variety of opponents. This, in our opinion, is the one and only meaningful way of training. 9.3 COMSEK I: THE PIVOTING KICKING SEQUENCES The purpose here is to train in footwork and kicks, paying particular attention to the use of the hips. The emphasis is on pivoting and switching from one kick to the next, shifting the weight in full balance, and on developing muscular control of the legs and the abdomen. Use is made of the isometric punches, the positioning of the arms blending with the motions of the body. Since we aim at proficiency on both sides, the left sequence is immediately followed by the right, which again leads into the left so that all Comseks can be continuously performed. They constitute one of the finest methods of physical conditioning. Comsek I comprises six sets of three kicks each. We start from the left B.T.S. and, at the end of the sixth sequence, we repeat the Comsek starting from the right B.T.S. All the key points mentioned earlier in connection with the footwork and kicks apply here. Movements should be smooth and continuous, paying particular attention to the proper use of the hips. The isometric punches must be meant, as if they were actually directed against an opponent behind you. Always direct your kicks at an imaginary target. In the "gunsight" and "cross step." the arms and torso are positioned so as to increase hip participation during these motions. Remember, the Comseks are only exercises. 1. Left B.T.S.: Low direct kick with the right foot; set right foot forward, toes pointing to the oblique right. Low direct kick with the left; set left foot forward, toes point to the oblique left. High direct kick with the right; set right foot forward, toes pointing ahead, and make an about face to the left leading to the . . . 2. Left B.T.S.: Low direct kick with the right; without setting the right foot down, pivot on the ball of the supporting (left) foot to the left and after lining up the body and bent knee in one plane deliver an ... Instep kick with the right; set right foot forward, toes pointing to the oblique right. Twist hips to the right assuming the "gunsight" position and deliver a ... Side-of-foot kick with the left; set left foot forward, toes pointing ahead, and make an about-face to the right leading to the ... 3. Right B.T.S.: Low direct kick with the left; set left foot forward, toes pointing to the oblique left. Twist hips to the left assuming the "gunsight" position and deliver a Side-of-foot kick with the right; set right foot in pigeon-toed position to the left and close to the left foot. Toes of both feet point to each other, the feet are at right angles to each other and the knees are turned inward pointing to each other. Body must be close to the vertical. Shift weight on the right foot and line up the left hip for a ... Circular kick with the left, which should be delivered facing the exact same direction as the preceding side-of-foot kick. Your hips have made a complete 360° turn; set left foot behind supporting (right) and assume the ... 4. Right B.T.S.: Low direct with the left foot; set left foot forward, toes pointing to the oblique left. Twist hips to the left assuming the "gunsight" position and deliver a... Circular kick with the right; set right foot to the left, toes pointing to those of the supporting (left) foot and, going through the same pigeon-toed pivot as described above, deliver a ... Side-of-foot kick with the left; set left foot forward, toes pointing ahead, and make an about-face to the ... 5. Right B.T.S.: Without stopping the turning motion of the hips let them lead you into the "gunsight" position for a. .. Side-of-foot kick with the left; set left foot forward, toes pointing to the oblique left and assume the "gunsight" position leading to a ... Circular kick with the right; set right foot for a pigeon-toed pivot as above leading to a . . . Side-of-foot kick with the left; set' foot forward, toes pointing ahead, and make an about-turn to the right leading to the ... 6. Right B.T.S.: Cross step bringing the left foot behind the right, toes in opposition, knees well bent. The feet are almost parallel to each other. Shift weight on the left foot and deliver an . . . Instep kick with the right; set right foot forward, toes pointing to the oblique right and deliver a. .. Side-of-foot kick with the left; set left foot forward, toes pointing to the oblique left and deliver a. .. Jumping side-of-foot kick with the right; set right foot behind the supporting (left) foot and make an about-face to take a ... Right B.T.S.: Start the whole sequence again from the other side (right B.T.S. instead of left). 9.4 COMSEK II: THE PIVOTING, STRIKING AND KICKING SEQUENCES
The purpose of this Comsek is to develop the same attributes as Comsek I plus arm muscle control. With minor differences, it is essentially identical to Comsek I as far as the kicks are concerned. Punches and a few blows, which are used in kickboxing self-defense, as explained later, are added at the end of each set of three kicks. The blows and punches are blended with the motion of the body, and must be performed in the relaxation-tension relaxation sequence we know. Like Comsek 1, Comsek II can be performed in endless continuity. 1. Left B.T.S.: At the end of the first set of Comsek 1, as you prepare to about-face to the left B.T.S., get in the ready position for the left reverse punch to the left temple of an imaginary opponent behind you, blending its delivery with the about-face to the ... 2. Left B.T.S.: At the end of the second set deliver a right direct punch to the solar plexus, followed by a left direct punch to the face and a right reverse punch to the right temple of an imaginary opponent behind you. The reverse punch is blended with the about-face to the ... 3. Right B.T.S.: At the end of this set, as you set the left foot behind the right, blend this motion with a double "elbow drive" performed as follows: Extend right hand forward at the level of the shoulder. At the same time, bring left forearm bent at breast level, palm also facing down. As your left foot touches the floor, thrust both elbows in two perpendicular straight lines, one in the direction of your right rear and the other in the perpendicular direction of your left side. Keep the shoulders down so as to be able to tense the muscles of the chest at the moment of the imaginary impact. Twist wrists so that the palms face up as you deliver the blows. You are still in the ...  Comsek II -Ending of Sequence 3 4. Right B.T.S.: At the end of which you blend the pivot with a right reverse punch leading to the . . . 5. Right B.T.S.: At the end of which about-face deliver an upward elbow drive with the left elbow as follows: Swing left elbow upward, arm grazing the side of the body. Raise elbow high as you stretch the left side of the body fully extending the left (rear) leg. The hips are twisted to the right and pushed in the direction of the blow. Right knee is bent enough to allow for full extension of the left leg, and the right toes point toward the oblique right. Head is turned to the right, chin against the collarbone, right fist in the B.T.S. position in front of the heart. At the moment of the imaginary impact, the left fist is near the left ear, palm facing nape. As usual, keep upper body close to the vertical. You are still in the ... 
Comsek II - Ending of Sequence 5   Comsek II -Ending of Sequence 6 6. Right B.T.S.: Cross step with the left foot behind the right as you twist hips a half turn to the left and you proceed with set ... At the end of which, after you about-face to the right B.T.S., which in Comsek I would be the beginning of the repetition of the whole sequence on the other side, you do not stop, but let your momentum lead you into a left rolling kick performed as follows: From the right B.T.S. take a left step forward timed with a wide overhead leading swing of the extended left arm which carries you into a forward roll. After delivering a left rolling kick, get up using your forward momentum, left foot leading. Shift weight on that foot and deliver a right heel spear. Then pivot to the right on the ball of the supporting (left) foot and facing the direction in which you just delivered the heel spear, take a... Right B.T.S.: Which is the start of the same sequence on the other side. As mentioned, you may practice the Comsek lI endlessly. 9.5 COMSEK III: THE STAR; KICKING IN ALL DIRECTIONS WITH ONE FOOT This Comsek presupposes the mastery of the previous ones. It is performed standing on one foot and develops a tremendous sense of balance and body-shifting ability. Like the previous ones this Comsek starts from the ... Left B.T.S.: All kicks are performed with the right foot, shifting the body by using the right leg as a flywheel and pivoting on the ball of the left foot. Right Foot Kicks: 1. Low direct kick in the direction you are facing. 2. Side-of-foot kick at 180° of the initial direction. 3. Instep kick at 60° of the initial direction. 4. Heel spear at 240° of the initial direction. 5. Circular kick at 120° of the initial direction. 6. Heel hook at 180° of the initial direction. 7. High direct kick at 300° of the initial direction. 8. Jumping side-of-foot kick at 240° of the initial direction. 9. Bring kicking (right) foot behind supporting foot, group them and deliver a right flying kick at 60° of the initial direction. Land in the Right B.T.S. and start the whole sequence again with the ... Left Foot Kicks: ... Use isometric punches where applicable. Continue for five more complete Comsek III sequences.  |
|
Send mail to
troyschultz@yahoo.com with
questions or comments about this web site. |