 The
American Self Protection Association, Inc.
The
American Self Protection Association, Inc.
Home of America's first Mixed Martial Art Training Method for the Entire Family
Parries, Deflec., Dodges
![]()
![]()
![]()
![]()
|
Home of America's first Mixed Martial Art Training Method for the Entire Family Parries, Deflec., Dodges
|
|
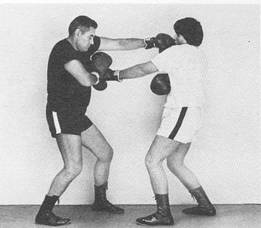
5.0 Parries, Deflections & Dodges In kickboxing, like in other fighting sports, the whole body is used in attacking, in feinting and in defense. We shall point out the use of the head, the arms, the hands and the elbows. 5.1. THE HEAD The head is a major target and can be protected either with parries and deflections or with appropriate dodges. Although these will be described later in detail, we give here a dodging exercise very useful for improving reflexes and timing. Face a partner who stands at arms length from you, with your feet spread at shoulder width. Hands on hips, let him attempt to slap you in the face, slowly at first, with his right hand, then with his left, in succession. Dodge by bending back at the waist. Return immediately to the starting position after having dodged his attack. As you become proficient, your partner increases the tempo and finally attacks at random (e.g., left, left, right, left, right, left, right, right, left, etc. ). Then you become the attacker and he the defender. Do not forget to look through his upper chest as previously explained (3.7). 5.2 THE HANDS, ARMS AND ELBOWS Arms and elbows are used for defense and for preparing the way to an attack. They are also used for performing throws which are legal in kickboxing. The hands* are primarily used to deliver punches and secondarily in parrying attacks. The use of the hands in self-defense is somewhat different. We are going to concern ourselves mainly with their use in kickboxing. The elbows are used only for parrying. In self-defense, however, they are also used for delivering blows. Such use is illegal in sport kickboxing for reasons of safety. 5.3 PARRIES AND DEFLECTIONS Kickboxing parries and deflections will be described from the left B.T.S. They are numbered from one to ten. In this context the terms parry and deflection are used interchangeably, since the same motion may be used either to parry (stop) or deflect, the end result depending on the timing and the direction of the blow. An inside parry makes use of the palm of the hand, while an outside one uses the back of the hand. * Understand gloved hands unless otherwise specified. PARRY ONE: From the left B.T.S. bring the left glove about five inches above the forehead, wrist in line with the nose and fingernails facing away from the face. The lower bony part of the forearm corresponding to the pinky (cubitus) is uppermost. This position results from an appropriate rotation of the forearm from the B.T.S. Parry One is rarely used, its purpose being to protect against overhead blows. Bend slightly the knees to brace yourself as you execute this parry. The right hand stays in the B.T.S. position, and the chin is tucked against the left shoulder. 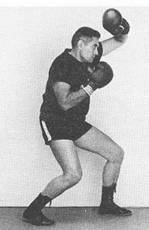  Parry One Parry Two PARRY TWO: This is similar to Parry One but executed with the right arm. Right hand is in essentially the same position above the forehead, nails facing away from you. Left fist is brought to heart level. This parry is also rarely used. PARRY THREE: Bring both forearms to the vertical, elbows close to the sides. The hands, on each side of the face, are held open and the chin is tucked against the chest. Bend slightly at the waist, tensing your abdominal muscles. This parry protects all vital organs above the waist and to some extent the head. Against circular blows directed to the sides, perform this parry with a slight rotation of the waist away from the blow in order to attenuate its impact. PARRY FOUR: Bring the right hand open at about three inches outside the right side of the face so as to protect your chin and temple. Parry with the backside of your right glove, forearm at the vertical (external parry). Bring left elbow close to the chest, left forearm almost vertical. Keep left hand open to protect your chin, which is tucked against the left collarbone. You must try to remain rock steady while using this parry, because - against a right-handed opponent delivering a left circular punch - you would open your face for a follow-up with a powerful right angle punch if you twisted toward your own left. PARRY FIVE: This parry protects the lower abdomen. Bring left forearm to the vertical, elbow seven to eight inches from the floating ribs. Parry with a slashing downward motion of the forearm. 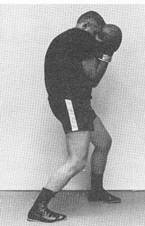 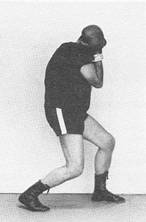 Parry Three Parry Four In the final position, the left arm is fully extended at a thirty-degree angle from the left side and in line with the left hip. Right hand stays at the B.T.S. position. PARRY SIX: Make a slashing motion with the right forearm to protect the lower abdomen. The right hand, starting from the B.T.S. position, stops in front of the right thigh, right arm in full extension. Left hand comes to protect the chin, while torso rotates slightly to the left. PARRY SEVEN: Cross forearms in front of forehead in a forceful thrust, palms facing out. Bend knees slightly to brace yourself against an overhead blow. This parry is rarely used in competition. 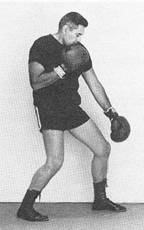 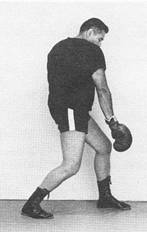 Parry Five Parry Six 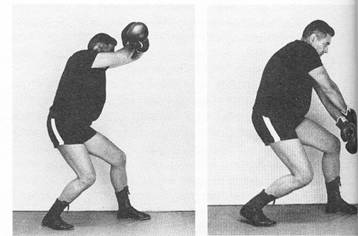 Parry Seven Parry Eight PARRY EIGHT: Make a similar action with forearms crossed, palms facing groin. Simultaneously bend knees slightly and retract abdomen, tensing its muscles. PARRY NINE: This parry is used against a left direct punch about to land. Deflect attack from right to left with a sharp short push of the right open hand (internal parry). Right thumb is facing the chest. This deflection has the advantage of upsetting opponent's balance toward his own right and allows you to counterattack with a left direct punch. An application of this parry against a left direct punch is shown. PARRY TEN: Deflect attack by sharply raising closest elbow, bringing forearm to the vertical while first sidestepping and then pivoting in the opposite direction. For instance, when the deflecting with the right elbow, pivot to the left on the ball of the right foot so that the body and the bent elbow are essentially in one plane. Right elbow is lifted at eye level and chin is tucked against right shoulder. An application of this parry against a left direct punch is shown. All the above may also be used in combination with leg parries.*  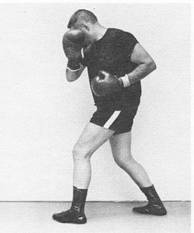
Parry Nine and Application 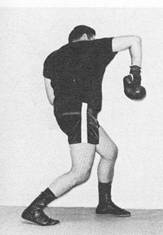 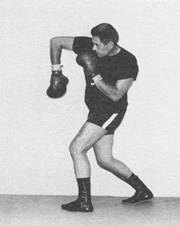
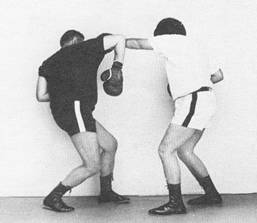
Parry Ten and Application 5.4 DODGING AND ITS ADVANTAGES OVER PARRYING Dodging consists in avoiding attack by shifting the body, or part of it, with or without footwork and with or without changing the guard. Dodges allow for powerful returns and counters and facilitate breaking through the opponent's defenses. They offer a great advantage over parries in that they allow freedom of both hands for retaliating. Furthermore, since an important aspect of self-defense entails getting out of the way or out of the reach of an attack, particular emphasis is placed on dodging techniques. They all have this in common: they induce the attacker to commit himself to his course of action, so that it is not easy for him to change its direction and speed. In dodging the body does not move initially as a block, the menaced part moves first away from the attack, so as to lead the attacker to commit himself. Only then does the rest of the body shifts as necessary to complete the dodging technique. Several dodging techniques are described throughout this book. * Note: Never "fetch" your opponent's attack; always let it come to your parry or deflection, the amplitude of which should be no wider than necessary. He must have the impression he barely missed you. Thus he commits himself fully and you can upset his balance easier and retaliate more powerfully. 5.4.1 From Full Distance B.T.S. I. Jumping Dodge The "jumping dodge" which must be practiced on both sides, is an extremely versatile self-defense technique that can be applied to all standing attacks. Our description is of a right side "jumping dodge." It is used when an opponent rushes toward you for any kind of reaching or striking attack. From the position facing him, withdraw the right foot and raise the right arm until it is level with the opponent's eyes, right fingers extended and spread apart, thumb bent and tucked under the palm, as if you were about to strike. In self-defense, and if you think that the situation calls for it, you may strike; however, bringing about a reaction on his part is all you really want. With the right arm extended, shift your weight on to the right (rear) foot, and lift the left knee bent, thigh almost parallel to the floor. While keeping the right arm extended and the left knee up, jump back and around to the left, or counterclockwise, to a position perpendicular to the direction of the attack. The left knee swings out and around acting as a flywheel to help in this change of direction. Now, set the left foot behind the right and, without stopping the momentum you have gathered, slide back the right foot, swinging the arms around and forward for a right rolling kick*, to your opponent's legs or groin. Your opponent was attacking you from a given direction and, knowing he had committed himself to this direction, you changed yours to a perpendicular one. As he attempts now to redirect his attack to your new position, he will, for a brief moment, be wide open for retaliation. It is very important that you react at the last possible moment, when the attack is almost there: keeping calm and relaxed is essential. As you finish your jump, do not stop your momentum but let the arms swing back around and forward, so as to carry you into a forward roll. Aim at his groin and kick it as you go through the last part of the roll. It takes some practice to master this technique, but it is well worth the effort, particularly, since it applies to cases where you may not care to come too close to your attacker. However, if you do not wish to roll and kick, you may simply let your momentum carry you back one or two more sliding steps. It is easy to gain in this way a lot of distance for any purpose you may choose. Make sure that the left knee is kept high as it swings around acting as flywheel: this is essential for efficient directional change and balance. As you get up from the forward roll, kick back with a heel spear (see page 37) to protect from a possible attack from the rear. The mastery of this technique alone gives you a pretty good chance to get out of most attacks. 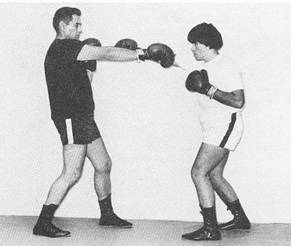 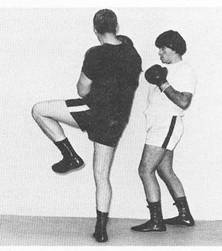 Jumping Dodge II. Dropping Dodge This dodge is particularly useful against striking attacks and we shall describe its use in a specific example. Naturally, it can be used in other cases. Opponent swings at you with his right hand. Move head back, away from the attack and thrust both arms, hands overlapping like a protective wedge, in the direction of his face. With the right foot take a big step near the left side of his left foot. Drop low, left knee almost touching the ground. Extend left leg in front of opponent's feet, then pass left arm behind his knees. With concerted action of both arms and body, push opponent in the direction of his momentum. He will fall on his face. As he falls, either start moving away in the direction of your first step, or pivot around and to the left on the ball of the right foot to get behind opponent. Be ready for further retaliation. The fall is severe; in practice, allow your partner to take a forward breakfall, or a roll, by applying the technique gently. As in all cases, your partner must mean his attack and keep his momentum, so as to give you a chance to apply the technique. He must also let his momentum carry him to his breakfall, or roll. The resulting smooth movement will help both partners to practice usefully. You may also apply a similar technique without touching your opponent, just by dodging and continuing your movement in the direction of your first step, whether he has toppled over your extended leg or not. Dodging under his right arm is also effective; however, it should be practiced only after you have mastered the foregoing. III. Pivoting Dodge This dodge helps to develop smooth coordination of the arms, legs, and body and trains one to place himself on the side and slightly behind an opponent. It may be practiced with or without the help of a partner. Stand relaxed, feet apart at shoulder width. Bring the arms up in two overlapping circles in a swinging and thrusting motion of the fully extended arms protects the upper body and head from being hit. As your arms swing upwards, step forward to the oblique right with the right foot at 45° approximately to the direction you were initially facing; then about face pivoting to the rear left on the ball of the same foot. The left foot describes a wide arc ending behind the right. The arms keep their momentum as they come down, and both swing to the left. Now close fists as you swing them hard to the right in an attack against the face or the side of opponent. The motion must be smooth and continuous and, as usual, the technique must be practiced on both sides. Contact between your arms and the opponent is not necessary during the phase preceding retaliation. The arms mainly serve to protect you during the pivoting action of the body which positions you on opponent's side, beyond his reach. If this goal can be achieved without contact, so much the better. You will find that, practiced right and left, upward and downward, this simple dodge will efficiently protect the body from the groin up. For the downward dodge, it is assumed that your abdomen is under attack and, therefore, this is the part of the body you retract first. The pivoting dodge may also be practiced without crossing the arms, but only by bringing them together, so that at the extended position the hands touch lightly each other. Practice the technique as described above, including this variation. Provided that you do not attempt to block the attack, but only to deflect it, it is immaterial which arm is uppermost. 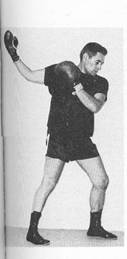 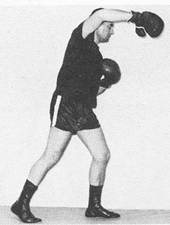 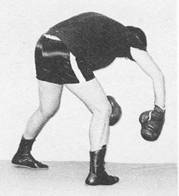 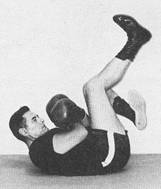 Rolling Kick Used With the Jumping Dodge * This kick is mostly used for self-defense. You may decide to gain only distance as described further. For the description of the rolling kick see also page 39. 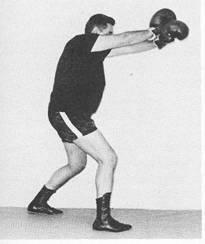 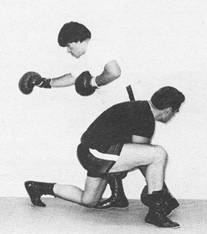 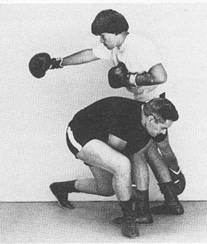 Dropping Dodge 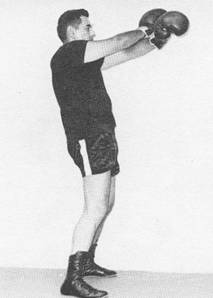 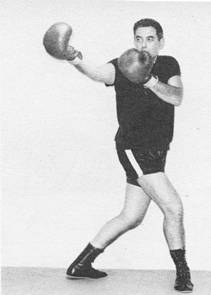 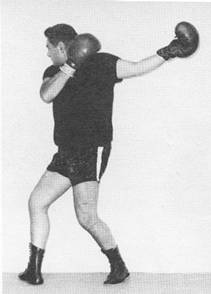 Pivoting Dodge 5.4.2 From Half-Distance B.T.S. I. To the Right Against a left angle punch to the face. Dodge the attack with a circular motion of the head and the trunk from left, to back, to right and forward (counterclockwise) without moving the feet, but dropping the hips, so that your head ends up under your opponent's attacking (left) arm. At the same time get ready to follow through with a retaliation of your choice. You may help the rotation of the head and trunk by slightly pivoting on the soles of the feet. Avoid too wide a circular motion; drop low, but not too low. Your head should stay above his belt level. As always, keep your guard up and eyes on the opponent. 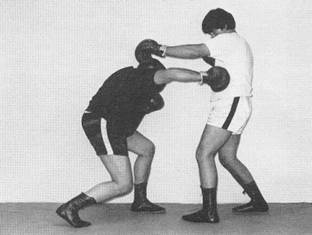 Dodge to the Right from Half-Distance B.T.S. With Retaliation 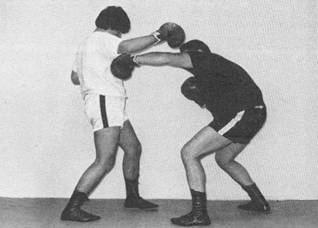 Dodge to the Left from Half-Distance B.T.S. With Retaliation II. To the Left Against a right angle punch to the face. Similar to above, but the body and head move back from right to left (clockwise), while you get ready to retaliate. III. Double Circular Dodge By combining the two dodges described above. For instance, first to the right, then to the left and counter with left and right punches (preferably, direct, or angle punches) to the body, or face. When properly performed, this retaliation packs a lot of power, because it is timed with the circular motion of the body. |
|
Send mail to
troyschultz@yahoo.com with
questions or comments about this web site. |