 The
American Self Protection Association, Inc.
The
American Self Protection Association, Inc.
Home of America's first Mixed Martial Art Training Method for the Entire Family
COMSEK 2
![]()
![]()
![]()
![]()
|
Home of America's first Mixed Martial Art Training Method for the Entire Family COMSEK 2
|
|
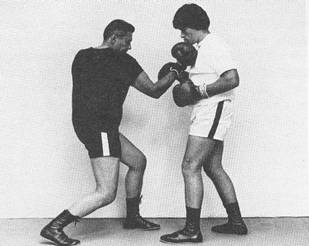
Kickboxing Punches - IN PLACE Obviously punches can be delivered only at arms length and therefore we shall see them from the Half-Distance B.T.S. They will be described first without footwork - in place. Then we shall see how to combine them with footwork. While there are a great many ways one can deliver blows with his hands, we shall confine ourselves only to the most useful ones in the sport of kickboxing. Punches may be delivered either from half-distance, or from close quarters, depending on the case. It is assumed that all are initiated from the Left Half-Distance B.T.S. LEFT DIRECT PUNCH This punch is aimed at the face. Deliver it with a snappy thrust of the left arm in the direction of opponent's chin. As the punch reaches the two thirds point in its trajectory, rotate fist to the right so that, when it reaches its target, the nails are facing the floor. Strike with the knuckles closest to the thumb. At the same time, twist body slightly to the right bringing left shoulder in line with the target, while right shoulder drops correspondingly. Chin is tucked under left shoulder for protection. Pivot slightly on the balls of the feet and stretch smartly the right leg, shifting most of the weight on the forward (left) foot. Return to the Left Half Distance B.T.S. by reversing instructions.  Left Half-Distance B.T.S. 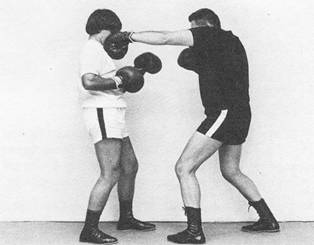 Left Direct Punch Key Points Twist wrist only toward the end of the trajectory, otherwise you will tend to lift the left elbow too soon, thereby exposing the left side and deflecting your punch from its target. Keep the head low, the chin protected and both feet firmly on the floor. Avoid pulling back the right shoulder for maximum power and good balance. When returning to the B.T.S. do not drop the left arm. Parry Nine is generally used against a left direct punch. RIGHT DIRECT PUNCH Mostly directed to the body. From the Left Half Distance B.T.S. this punch is delivered with a snappy thrust of the right arm as follows: Turn right wrist one quarter turn to the left as the punch reaches the last third of its trajectory and land on the target with the first two knuckles; nails facing the floor. Twist waist and pivot slightly to the left on the soles of the feet, so as to line up the right shoulder with the target. Tuck chin under right shoulder. When you deliver the punch both feet should be almost parallel. Stretch smartly, but not completely, the right leg so as to shift most of the weight on the forward (left) foot. Reverse instructions to return to the left B.T.S. 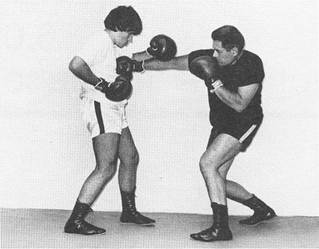 Right Direct Punch When delivering a right direct punch to the body, for instance to the solar plexus, bend knees sufficiently to bring the right shoulder to target level. The punch will thus pack maximum power. Key Points Same as for the left direct. Line up right shoulder with target. Use right shoulder to protect chin. If you do not keep the feet almost parallel to each other, you may lose balance and you will find it difficult to follow through with other punches such as a left angle, or a lift punch. LEFT ANGLE PUNCH In order to deliver an angle punch to opponent's face, lift left arm shoulder high, forearm and arm at right angles to each other, nails facing the floor. Deliver punch with full power from the shoulders, rotating the upper body to the right, while slightly bending forward from the waist without dropping the hips. The left arm extends only partially and the chin is tucked behind the left shoulder which is kept higher than the right. Left forearm must always be at an angle with the arm. Deliver the punch with the knuckles as previously. Aid twisting action to the right by pivoting slightly on the soles of your feet, while pointing left knee slightly inward. The weight is quickly shifted from the rear to the forward (left) foot by a sharp extension of the rear leg. Meanwhile, get your right fist ready for a follow-through with another angle punch, or with a lift punch. Return to the left B.T.S. as fast as possible. Your punch will pack maximum power when delivered with shoulder and elbow joints in a locked position. 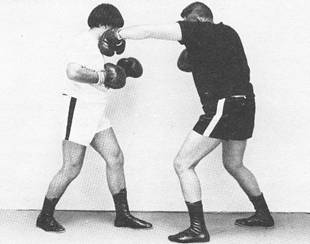 Left Angle Punch Key Points Avoid delivering this punch in a wide, circular motion, because should you miss, you will be wide open for a right counter punch. The angle punch offers the advantage of leading into a direct punch, should the opponent retreat. 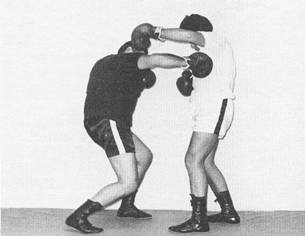 Right Angle Punch RIGHT ANGLE PUNCH It is usually directed to the body and it is identical with the left angle punch, except that it is the right arm which is now lifted shoulder high nails facing the floor. Since the distance from the target is now greater, the torsion of the upper body is accompanied by a more pronounced forward bending at the waist. The right knee is pointing inward and both knees are sufficiently bent to allow the right shoulder to line up with the target. Shift weight on the forward left foot by stretching partially the right leg. Key Points Bend knees enough to line up the right shoulder with the target. Avoid a circular swing. LEFT LIFT PUNCH 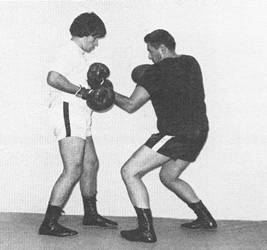 Left Lift Punch This punch is delivered from a low point to a higher one, hence its name. The left fist strikes the solar plexus, knuckles pointing up. Left forearm is at right angle with left arm and both are in one plane with the left side. Bend slightly to the left and deliver punch with a twist of the body to the right. At the moment of impact the left shoulder is in front of the target for maximum power and the chin seeks protection behind the left shoulder. Stretch the rear (right) leg in order to shift weight on the left foot. Right fist is kept in front of the heart ready for a follow-through. Return to the left B.T.S. by reversing instructions. When you prepare to deliver the lift punch, do not tip off opponent by dropping the left fist below the belt. Key Points This is a tight short punch which should be delivered with full concentration of mind and body. Avoid lifting the chin and tense abdominal muscles as punch lands. RIGHT LIFT PUNCH Similar to above except that one bends slightly to the right. The leftward rotation of the body is more pronounced and the right knee points slightly inwards. Bring the chin to the level of the target, which in this case is the opponent's chin. Stretch partially the right leg, but most of the weight should remain on it. In contrast to all the previous punches, this is the only one delivered with the weight on the rear (right) foot. Key Points Avoid shifting weight on the forward (left) foot. Obviously, for right angle and lift punches, one stretches the right leg more for attacks to the face than to the body, since the right shoulder must be at target level.
Right Lift Punch LEFT CIRCULAR PUNCH Drop left arm alongside the body, then lift it laterally at shoulder level. Make sure that the arm drops alongside the body and not behind it. Turn the left wrist a quarter turn to the right and deliver punch so you strike your opponent's face with the back of the hand. Simultaneously, rotate the upper body slightly to the right. Tuck chin behind left shoulder. The left foot and knee are turned slightly inside and the weight is shifted to the forward (left) foot. The right fist is at the ready position in front of the heart. Because one is more vulnerable when using this punch, it is very important to return to the left B.T.S. 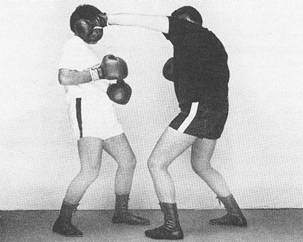 Left Circular Punch Key Points Because it is delivered with a broad motion, this punch is relatively easy to parry. Make sure, therefore, not to let your left arm drop behind the body and not to let the left fist be carried beyond the line joining your chin to the target. Indeed, this would result in opening completely your left flank. Use only the knuckles and the back of the hand. RIGHT CIRCULAR PUNCH 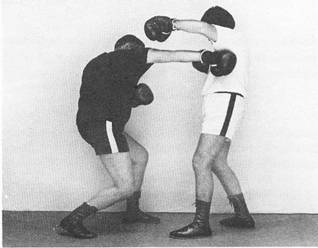 Right Circular Punch Similar to above, except that the rotation of the body toward the left is more pronounced. The chin seeks protection behind the right shoulder and the right foot and knee are pointing slightly inwards. The left fist is at the ready position in front of the heart. Knees and waist are bent enough to bring the right shoulder in line with the target. Key Points Because it is delivered with a broad motion, this punch is relatively easy to parry. Make sure, therefore, not to let your right arm drop behind the body and not to let the right fist be carried beyond the line joining your chin to the target. Indeed, this would result in opening completely your right flank. Use only the knuckles and the back of the hand. LEFT REVERSE PUNCH Rotate the upper body one quarter turn to the right. Bring left hand to right ear, nails facing it. 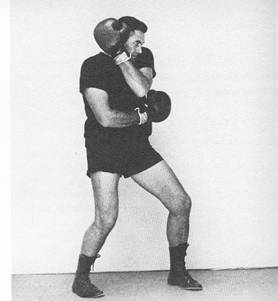 Left Reverse Punch Bring right hand at the level of the left ribs. Deliver punch with the back or the side of tightly closed left fist. Key Points Line up left shoulder with target and do not let left fist go past the chin-target line. Return fast to the B.T.S. RIGHT REVERSE PUNCH Similar to above. Rotation is quarter turn to the left, and position of the arms is inverted. Key Points Line up right shoulder with target and do not let right fist go past the chin-target line. Return fast to the B.T.S. 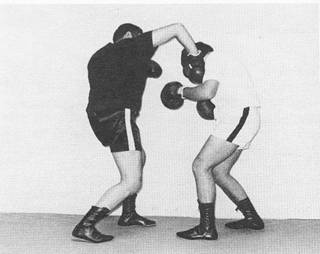 Right Plunging Punch PLUNGING PUNCH It is delivered with the right, or left fist passing through and above the guard of a crouching opponent. Target is the side of the face. COUNTERS AND STOP PUNCHES Some examples are given below. Since all possible combinations of the techniques we have seen are too numerous to be exhaustively treated here, we are going to restrict ourselves to a few typical situations involving the most commonly used attacks, i.e., direct and angle punches. Against a Left Direct Punch A. Dodge by moving away the upper body and retaliate with a left direct to the body or the face, adjusting distance as necessary. This requirement is implied in all cases of exchange of blows and it stands to reason. 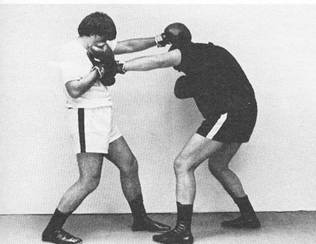 Against a Left Direct Punch (A) 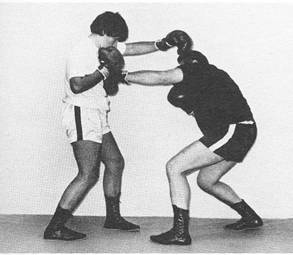 Against a Left Direct Punch (C) 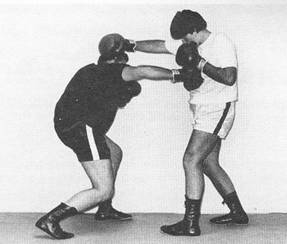 Against a Right Direct Punch (A) 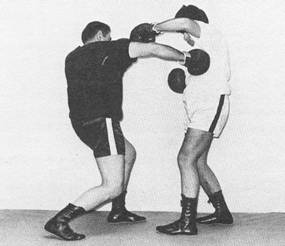 Against a Left Angle Punch B. Dodge by stepping back, then step forward and retaliate with a left direct to the face. C. Sidestep, moving head to right and retaliate with a left angle punch to the heart or the face. D. Stop your opponent in the preparation of his attack with right plunging punch to the face delivered over his attacking arm. Against a Right Direct Punch A. Dodge by moving the head to the rear left and retaliate with a right angle punch to the solar plexus or to the face. B. Similar to above (D), using a left plunging punch. Against a Left Direct, or Angle Punch Dodge with a lateral step to the right and retaliate with a right angle punch to the body. Against a Right Direct, or Angle Punch Dodge with a lateral step to the left and retaliate with a left angle punch to the body. Against a Punch to the Chest Pull back left shoulder, using Parry Nine and retaliate with a left direct or angle punch to the face. 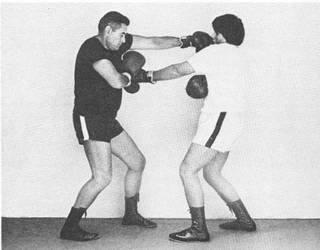 Against a Punch to the Chest Kickboxing Punches - In Motion As already mentioned the possible combinations of the punching techniques are very numerous and cannot be described exhaustively here. Besides, this is not necessary, because once the fundamentals have been mastered, the student will develop his own fighting style and combinations. The following sequence shows how to approach training with the help of a partner: a. First condition yourself. Do not skip this phase of training in your eagerness to get started. Always take time to warm up before the actual kickboxing training. b. Train in footwork alone. c. Train in dodging and parrying alone. d. Train in the basic punches with a punching ball first, then with a sandbag. e. Work with a partner on the dodges and parries given above. Slowly, as your techniques improve, increase speed without sacrificing accuracy. Make a serious effort to become ambidextrous: work on both sides as much as possible. f. Then, and only then, spar. Spar against opponents with different physiques if possible, using only punches. A similar sequence is also recommended for kicking techniques, which should also be studied separately. Finally, as you become proficient, conclude your training sessions by sparring with punches and kicks in true kickboxing style. Such approach offers the student the great advantage that he becomes thoroughly familiar with all the elements of kickboxing first, then with their useful combinations, without any important omissions. The student should never lose from sight the priorities as earlier explained. COMSEK II: THE PIVOTING, STRIKING AND KICKING SEQUENCES
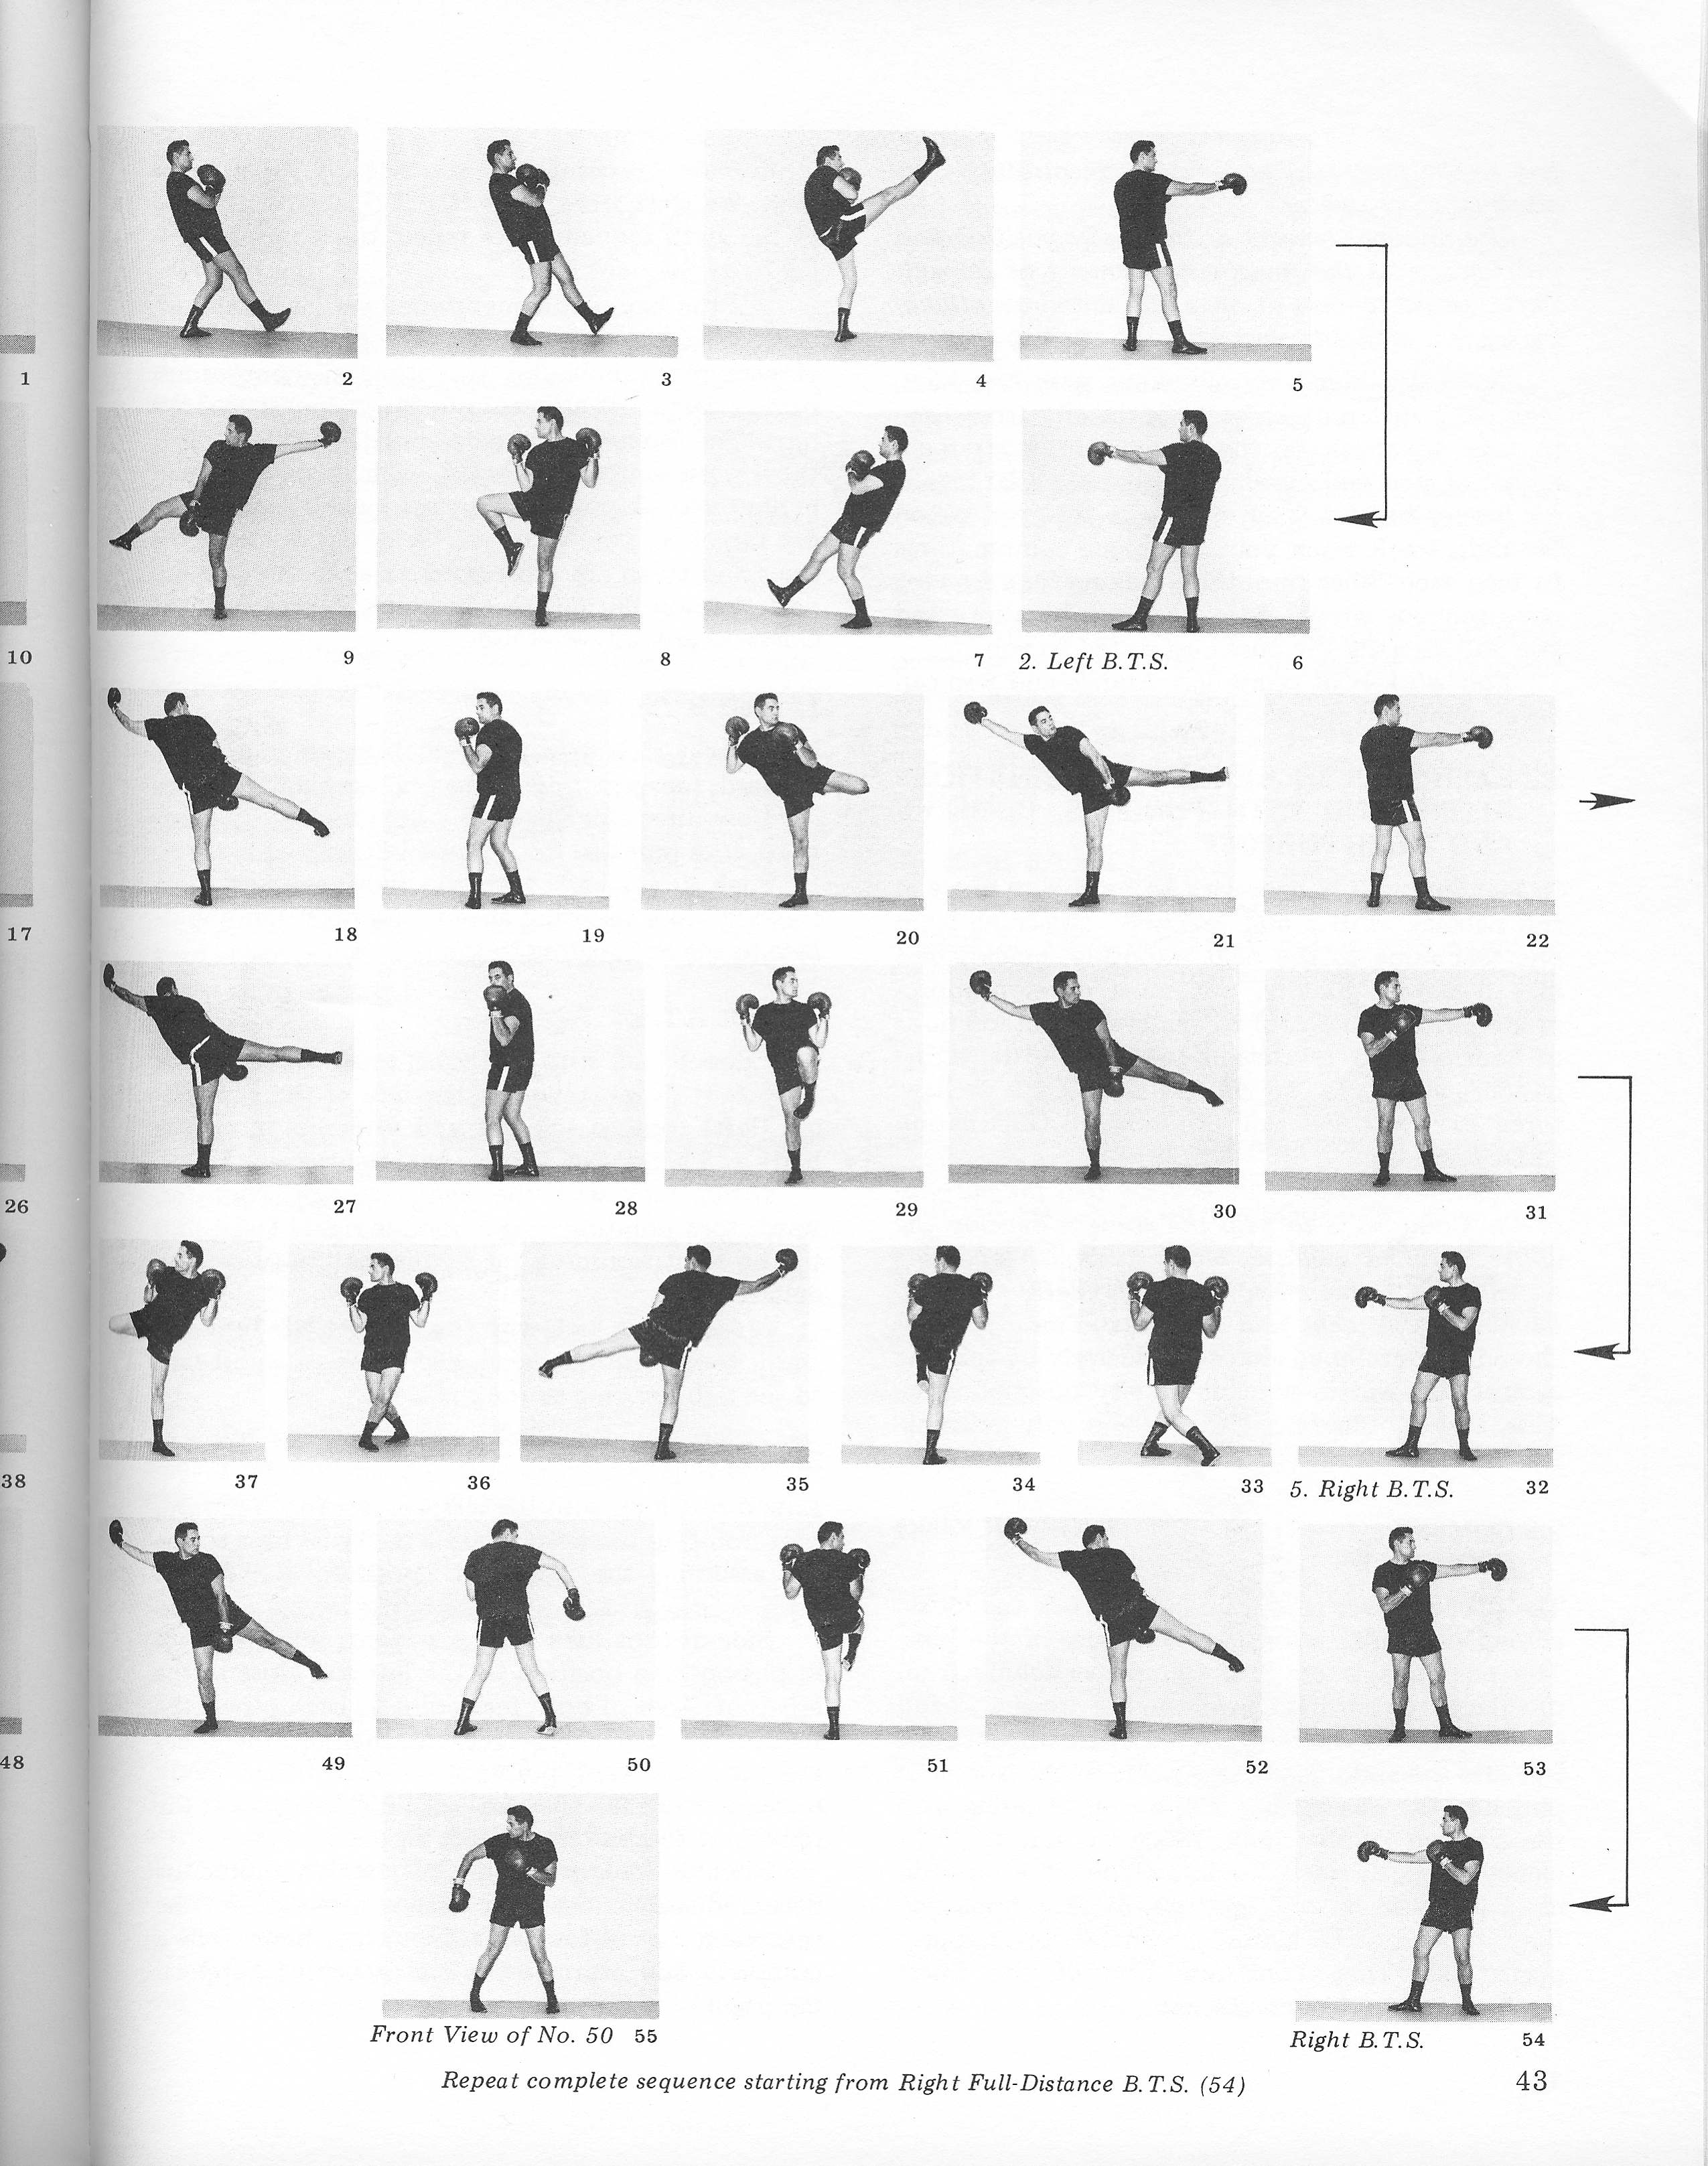
The purpose of this Comsek is to develop the same attributes as Comsek I plus arm muscle control. With minor differences, it is essentially identical to Comsek I as far as the kicks are concerned. Punches and a few blows, which are used in kickboxing self-defense, as explained later, are added at the end of each set of three kicks. The blows and punches are blended with the motion of the body, and must be performed in the relaxation-tension relaxation sequence we know. Like Comsek 1, Comsek II can be performed in endless continuity. 1. Left B.T.S.: At the end of the first set of Comsek 1, as you prepare to about-face to the left B.T.S., get in the ready position for the left reverse punch to the left temple of an imaginary opponent behind you, blending its delivery with the about-face to the ... 2. Left B.T.S.: At the end of the second set deliver a right direct punch to the solar plexus, followed by a left direct punch to the face and a right reverse punch to the right temple of an imaginary opponent behind you. The reverse punch is blended with the about-face to the ... 3. Right B.T.S.: At the end of this set, as you set the left foot behind the right, blend this motion with a double "elbow drive" performed as follows: Extend right hand forward at the level of the shoulder. At the same time, bring left forearm bent at breast level, palm also facing down. As your left foot touches the floor, thrust both elbows in two perpendicular straight lines, one in the direction of your right rear and the other in the perpendicular direction of your left side. Keep the shoulders down so as to be able to tense the muscles of the chest at the moment of the imaginary impact. Twist wrists so that the palms face up as you deliver the blows. You are still in the ... 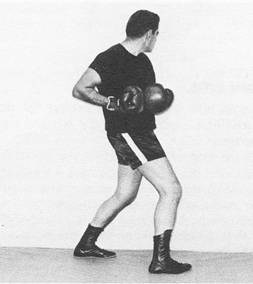 Comsek II -Ending of Sequence 3 4. Right B.T.S.: At the end of which you blend the pivot with a right reverse punch leading to the . . . 5. Right B.T.S.: At the end of which about-face deliver an upward elbow drive with the left elbow as follows: Swing left elbow upward, arm grazing the side of the body. Raise elbow high as you stretch the left side of the body fully extending the left (rear) leg. The hips are twisted to the right and pushed in the direction of the blow. Right knee is bent enough to allow for full extension of the left leg, and the right toes point toward the oblique right. Head is turned to the right, chin against the collarbone, right fist in the B.T.S. position in front of the heart. At the moment of the imaginary impact, the left fist is near the left ear, palm facing nape. As usual, keep upper body close to the vertical. You are still in the ... 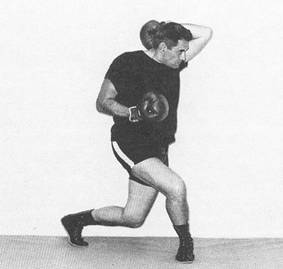
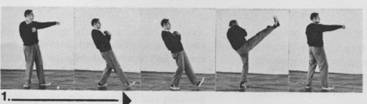
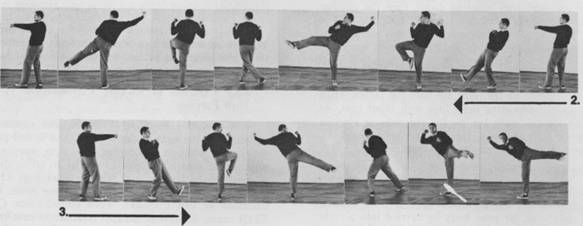
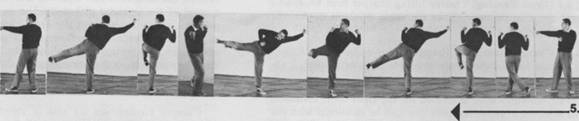
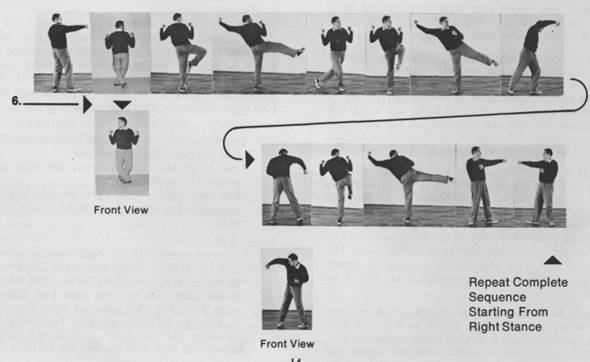
Comsek II - Ending of Sequence 5 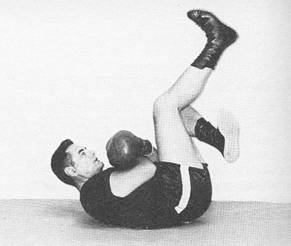 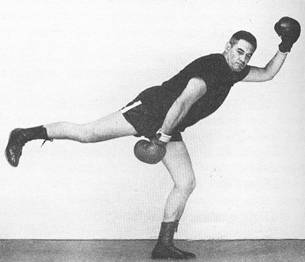 Comsek II -Ending of Sequence 6 6. Right B.T.S.: Cross step with the left foot behind the right as you twist hips a half turn to the left and you proceed with set ... At the end of which, after you about-face to the right B.T.S., which in Comsek I would be the beginning of the repetition of the whole sequence on the other side, you do not stop, but let your momentum lead you into a left rolling kick performed as follows: From the right B.T.S. take a left step forward timed with a wide overhead leading swing of the extended left arm which carries you into a forward roll. After delivering a left rolling kick, get up using your forward momentum, left foot leading. Shift weight on that foot and deliver a right heel spear. Then pivot to the right on the ball of the supporting (left) foot and facing the direction in which you just delivered the heel spear, take a... Right B.T.S.: Which is the start of the same sequence on the other side. As mentioned, you may practice the Comsek lI endlessly.
|
|
Send mail to
troyschultz@yahoo.com with
questions or comments about this web site. |