 The
American Self Protection Association, Inc.
The
American Self Protection Association, Inc.
Home of America's first Mixed Martial Art Training Method for the Entire Family
Red I
![]()
![]()
![]()
![]()
|
Home of America's first Mixed Martial Art Training Method for the Entire Family Red I
|
|
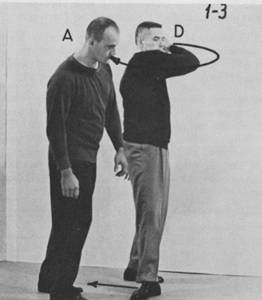
3.0 RED BELT FIRST GRADE PROGRAM Requirements: All the previous, plus knowledge of techniques #1 to 10 inclusive. PURPOSE OF THE PROGRAM: Ten techniques are devoted to defenses against wrist and hand grips because they are the simplest and best suited for teaching the student the application of the five principles to defensive situations, The first nine do not involve any falls so as to give the student time to master his breakfalls and rolls for safe practice. Initiation to free sparring with the techniques learned. Because of the importance of rolls in attack and defense, they must be incorporated in all training and free sparring. After performing a defensive technique one should immediately execute an appropriate roll complemented by an appropriate kick. A.S.P. does not use kicks aiming higher than waist level. High kicks may be good for training and for show, but they are neither necessary nor accessible to many. SIMPLE ATTACKS FROM THE FRONT: In the following techniques simple blows and kicks are used. To develop skill in their use, one has to learn not only where to strike, but also how to strike. For effective self-defense retaliation is secondary to body positioning and shifting In keeping with this emphasis, we shall describe means to retaliate only as related to specific techniques. 3.1 IMPORTANT COMMENTS ON BASIC ASP SELF DEFENSE TECHNIQUES The basic ASP techniques were chosen because of their efficacy, but also and mainly because they condition the student to the use of the Five Principles. This is the first and MOST important step. Beginners usually think of the retaliation part of the techniques as being the most important. Actually, at this stage it is the /east important Dodging an attack, or foiling it by appropriate body positioning and shifting in accordance with the Five Principles, comes first. UNLESS YOU UNDERSTAND THIS, YOU WILL NOT UNDERSTAND ASP. THE TECHNIQUES YOU WILL LEARN ARE A MEANS TO AN END AND LOSE THEIR MEANING IF YOU TAKE THEM INDIVIDUALLY, OUT OF CONTEXT. IF YOU ARE INCLINED TO DO SO, STOP HERE AND DO NOT WASTE YOUR TIME READING ANY FARTHER. ASP is not a bunch of individual techniques thrown together like so many so called "systems". In the defensive techniques required for the first degree Black Belt ASP, neither locks, nor chokes are used, for two reasons: (A) They are not necessary for efficient self-defense. (B) They require lengthy training in order to be mastered. Their study is a part of the more advanced ASP program, where every basic technique in this book is shown to lead to controlling locks and chokes. We have kept variations of the techniques given here to an absolute minimum, in order not to confuse the student with many alternatives. Besides, with the elements he has learned, he will have no difficulty devising his own. Promotional requirements do not include technique variations. Confidence and skill go hand in hand. Practice is essential in developing any skill, however, it should be consistent with the proper understanding and application of the principles involved. Such practice will result in applying the ASP techniques instinctively, without much forethought. Initially all techniques must be practiced slowly until their constituent parts have been properly understood and performed. Speed should develop as a result of practice. The Attacker must permit the Defender to execute the technique, offering only passive resistance. Active resistance results often in injuries and slows down the learning process. Blows and kicks must be simulated and replaced by pushing or touching. However, the person who is supposed to receive them must react realistically, as if he were really hurt. This is very important for meaningful practice. As mentioned earlier (and it bears repetition) the most important part of every defensive technique is the one enabling you to foil the attack and to place your opponent in a position from which he can be easily hurt or thrown. Speed is most important here. The retaliation part of each technique, however, must be done more slowly, in order to avoid injuries. Practice according to the. Five Principles develops some very important attributes the first of which is balance. One cannot perform at his full physical potential when even slightly off balance. However, balance should not be achieved at the detriment of mobility. It is true that balance is improved upon lowering one's center of gravity by bending the knees, while spreading and staggering the feet to increase the base of support. Such position, however, invariably results in some loss of mobility and must be taken only as an expedient to brace momentarily against an attack threatening one's balance. The natural erect posture, or one close to it, is best for balance and mobility and should be adopted whenever possible. Efficient use of leverage, particularly in lifting, requires one to be quite close to the object he is about to lift. The resulting favorable lever arm ratio helps lifting with minimum expenditure of energy. On the contrary, developing momentum though the use of centripetal force requires the longest radius possible and therefore, the greatest distance from the axis of the body to the point where this momentum is to be applied. Power developed via leverage or momentum is best used either against one of the many weak areas of the opponent, or for directing and guiding his movements, rather than opposing them. The large unprotected and rather soft abdominal area and the area near the floating ribs are very vulnerable to blows, particularly during inhalation, when the abdominal muscles are relatively relaxed and the lungs are filling with air. Conversely, exhaling sharply when receiving a blow, gives you some protection, because it tenses the abdominal muscles and braces them against the impact. It is also helpful when delivering a blow, because it firms up the large muscles of the trunk and abdomen and helps in the effective transmission of the power of the trunk to the opponent, either through one's own body or through his limbs. There are several parts of the body which can be used to deliver blows in self-defense as well as in retaliation. In order to develop skill in their use, one has to learn not only where to strike, but also how to strike. We said earlier that for effective self-defense, retaliation is secondary to body positioning and shifting. In keeping with this emphasis, we shall describe means to retaliate only as related to specific techniques . AS THE ASP STUDENT PROGRESSES HE WILL FIND THAT THE INITIAL KICKING OR STRIKING TECHNIQUES BECOME LESS AND LESS NECESSARY. All techniques must he considered as potentially dangerous and must he practiced with caution When retaliating, either make a gentle but firm contact, or preferably, keep your momentum, but deflect it from the target. The techniques are numbered sequentially in the order they must be studied. Now some definitions: A stands for Attacker, D stands for Defender, Normal Grip: the thumb of the gripping hand points up and away from the body, Reverse Grip: thumb points down and toward the body. 3.2 WRIST AND HAND GRIPS #1. Left Hand Against Right Wrist - Normal Grip. (Fig 1-1,2,3) The attacker A, grabs with his left hand in a normal grip D's right wrist. The latter immediately opens his hand and spreads his fingers. His shoulders remain low and relaxed and he clues not pull back his wrist. These two points: opening the hand and not pulling back the wrist, are important. Opening the hand and extending the fingers, facilitates the rotation of the wrist. On the other hand, pulling back one's wrist makes the transmission of D's force less efficient, because it shortens the length of the lever involved. D protects himself by placing the left fist in front of the chest and then kicks with the right foot A's lower shinbone. In training, a gentle but firm contact is advisable. It does not matter if D kicks A with the other foot: ASP techniques allow for variations, however, at this stage D always kicks with the foot on flee• side of the attack in order to minimize confusion. In general, he must retaliate on the closest target (shinbone in this instance). Then D sets his foot under A's grip. This point is also important because D's right wrist and the ball of his right foot become an axis around which D pivots to his left like a door around its hinges, gathering momentum with a leftward swing of both arms. Pivoting to the side of A, is thus achieved with least effort. This fundamental pivot must be mastered at the onset. Here again we want to create a conditioned reflex, because D should always position himself so that it is not easy for A to follow with another attack. Obviously, A may let go after a kick to the shinbone, but he may also hang on the continue with another attack. This is why we study a complete technique which will always work, whether the kick brings about the expected reaction or not. ASP also takes into consideration the fact that at times a kick to the shinbone is not warranted. In this situation, indicating the intention to kick in order to bring about a reaction on the part of A may suffice. As D pivots to the left, he turns his wrist in that direction and bends it so that the thumb points toward his own body. The upper part (radial) of D's wrist is brought to bear against A's thumb and forefinger. D pushes down with his right wrist. This motion, together with D's pivoting, brings the lower bony side (ulnar) of his wrist against the crotch of A's hand, which serves as a fulcrum, and breaks the hold. D's arm is held in relaxed-rigid extension: relaxed-rigidity* is constantly used in ASP. Now D's wrist is free, he keeps and increases the momentum gathered, by continuing to swing his arms to the left. Then D, brings his right fist, at the level of the left ear and gathering momentum, strikes with the side of the fist below the tip of A's nose. Before he strikes, D slides back his right foot which comes to rest behind A's left foot. Keeping shoulders relaxed, D should step first and strike after, D is now behind A's left side and has the possibility to pursue retaliation with a double punch below A's floating ribs. NOTE: The basic motions involved in this and other defenses are used repeatedly with the object to becoming conditioned reflexes. The retaliations described in this book are only examples: many other possibilities exist. Their importance is secondary; in this technique for instance getting out of the grip and behind A is more important than retaliating. 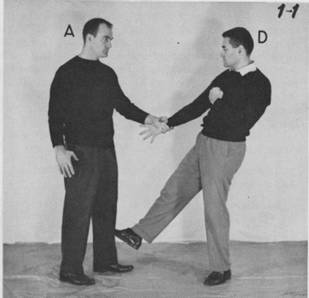 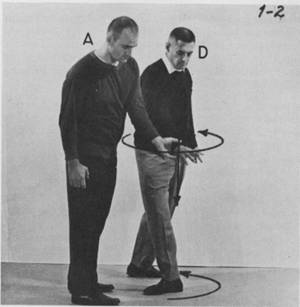
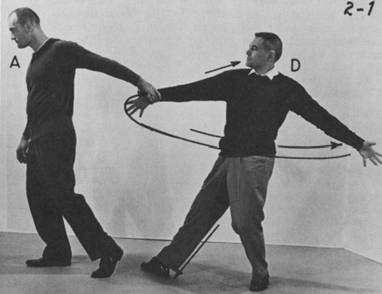
#2. Left Hand Against Right Wrist. - Reverse Grip with Pull. (Fig 2-1,2,3) A graps D with a reverse grip, thumb pointing down and, turning his back, forces him to follow. This attack is often used against girls and women. D does not resist, but thrusts his right hip forward first and places his right foot under A's grip, toes pointing rightward, leg completely extended, in line with A's foot. D must keep the right side of his body in a straight line from head to ankle. If D attempts to pull the upper part of his body back, rather than to thrust his hip forward he will fail against a stronger opponent. His right arm must be extended and relaxed, the pull coming from the back at the shoulder. His right arm is now acting only as a connecting rod. The object is to stop the impetus of A's pull for a fraction of a second. This time will enable D to gather enough momentum for the technique he is going to perform, and also then, to utilize the extra momentum developed when A pulls harder as soon as he meets with resistance. D gathers momentum by swinging in relaxation his body and arms fully extended to the left, as far as possible without moving his feet. He then changes direction, and swings back to the right to strike with force the back of A's hand with the palm of his left hand. This energy transfer, timed with the swing of D's body to the right, will liberate his hand easily. D, holding now A's left wrist, swings his arms to the left, steps forward with the left foot, and retaliates with a right punch to A's floating ribs. *After D has mastered this kinetic transfer technique, he may free his wrist as follows: he opens his hand and rotates his wrist counter clockwise in a wide motion: the pressure on A's thumb liberates D's wrist. The preliminaries are the same as in the previous technique.
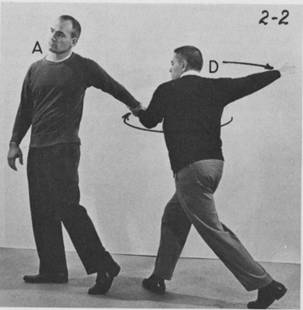
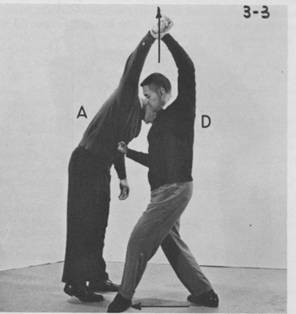
#3. Right Hand Against Right Wrist - Normal Grip. (Fig 3-1,2,3) D immediately opens his hand wide and spreads his fingers apart. From this position, D protects himself by placing his left fist in front of the chest, and kicks with his right foot (same side as the grip) A's closest shinbone. Then D places his right foot under the grip, and slides his left foot as far back as he can, so that his right arm is fully extended, in order to develop maximum momentum. Then, with a swinging motion as previously described he frees his wrist by slapping A's wrist with the palm of his left hand. The narrow side of D's wrist must be so positioned as to face the weakest part of A's grip, between the thumb and the forefinger. D is holding A's right arm as he swings back to the left, thereby leaving him wide open to retaliation. D throws a right punch to A's solar plexus. *Relaxed-rigidity is obtained when D is relaxed but thinks of his body and limbs are being in rigid extension. +Alternatively, D may strike with his hand crescent A's Adam's apple. 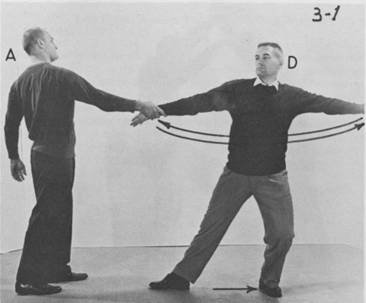 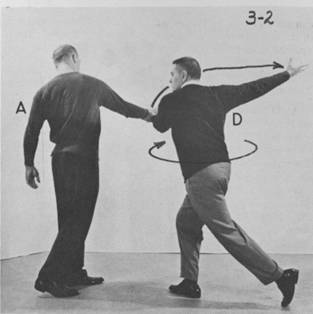
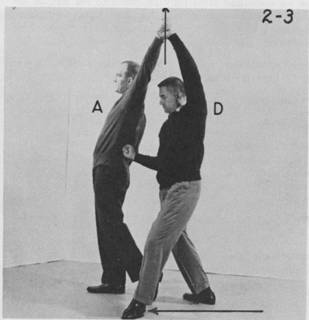
#4. Right Hand Against Right Wrist - Reverse Grip. (Fig 4-1) Although it might appear unlikely to the non-initiated, this attack is studied because it is the beginning for a number of most severe wrist and arm twisting techniques, studied in intermediate and advanced ASP. Starting from this technique, the preliminaries described in detail previously will not be repeated. D kicks A's closest shinbone with the right foot then sets it under A's grip. D steps to A's right side with his left foot. Now D positions his right wrist so that the thumb points toward his body, as in technique #1, and liberates it by bringing to bear his weight against A's thumb and forefinger. To this effect, D bends the knees and twists his hips leftward, swinging both arms in the same direction. This is a typical ASP technique utilizing leverage and body weight transmitted through relaxed-rigid extension of the arm. After having liberated his right wrist, D gathers momentum swinging arms and body first to the left, then to the right and strikes the base of A's skull with the side of his right fist. This is a severe retaliation. However, as in all' techniques described, an example of retaliation is given which D does not have to follow. For instance, he may choose to strike A's floating ribs. D must use judgment according to the situation. *If the grip is very strong, D will be able to free his wrist by stepping behind A, to the oblique right with his right foot, as he bends the right arm for an elbow jab under A's floating ribs. In case A pulls away with such grip, he must be considered much less dangerous: D may liberate his right wrist by bending it in the direction of the thumb and imparting to his arm a wide, circular movement to the right (clockwise).  #5. Two Hands Against One Wrist from Above - Normal Grip. (Fig 5-1,2) D opens immediately his right hand and kicks A's closest shinbone with the right foot, which he then sets under A's grip. D closes the right hand into a tight fist and reaches with his left hand between A's arms to grasp it from antler, palm facing the right middle fingers. D pivots then to the left, first spreading his elbows apart, then thrusting his fists toward A's right shoulder. The lower bony part of D's left forearm (ulnar) forms a lever with the upper bony part of A's right forearm (radial) as fulcrum. By keeping his left wrist unbent, his elbows, pushing out, up and around, toward A's right shoulder, D develops a powerful lever. After D has liberated his wrist, he keeps his leftward momentum and when this is coming to an end he changes direction and strikes with the side of the right fist A's nose tip or side, as previously.  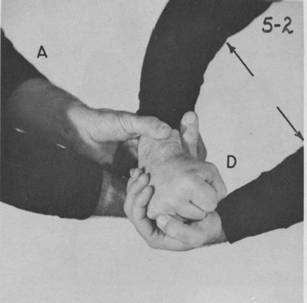 #6. Two Hands Against One Wrist from Under - Normal Grip. (Fig 6-1) Similar to above, except the D's left hand goes now under and in between A's hands to grasp the upper part of his right fist. Spread elbows apart as you pivot, and thrust fist out down and around toward A's right side. 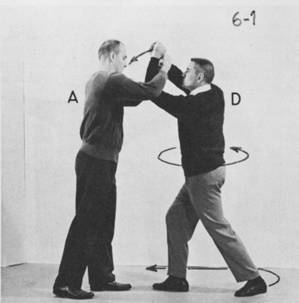
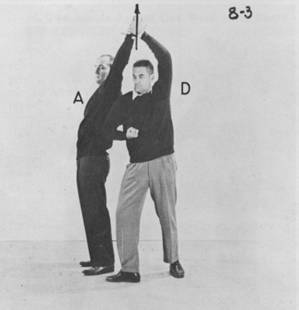
#7. Two Hands Against Two Wrists Before Normal Grip is Secured. (Fig 7-1,2) A attempts to grab D's wrists. D slides one foot back and bends the knees. In doing so he lifts A's arms by bending upwards his wrists to cradle A's wrists in the crescents formed by his thumbs and index fingers. Bending the knees is very important, otherwise, D may not be able to avoid A's attack. Then D pushes A's arms up, while keeping his own extended, and kicks A's closest shinbone with his rear (left) foot. D sets this foot under A's corresponding wrist, pivots rightwards on the ball of the left foot and at the same time, throws A's arms in the opposite direction, to the left. A's right side is now wide open for retaliation and D may for instance, strike it with a left elbow jab. This is the only preventive, "before", technique in basic ASP which is classified separately from the "secured" one. Here D learns to move his body in unison with A. As A moves toward D, the latter must move away from A at the same speed so as to keep their mutual distance almost unchanged. 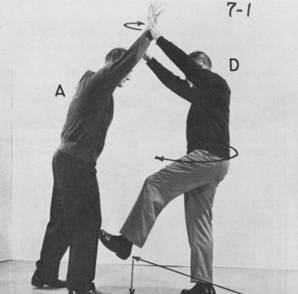 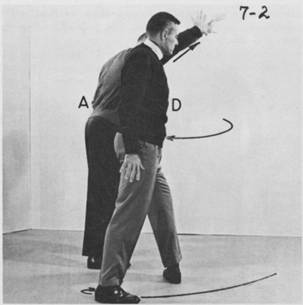 #8. Two Hands Against Two Wrists - Normal Grip is Secured. (Fig. 8-1,2,3) Same attack as previously, but D was not able to prevent the grip. D opens his hands, kicks A on the shinbone sets the kicking foot under A's grip, and slides the other foot back, far enough to swing his arms open and pull A forward. D's extended arms serve only as connecting rods: he should not attempt to use them otherwise, because against a stronger and heavier opponent, he will undoubtedly fail. D must relax the shoulders and pull with the body; all he wants is to make A react so as to grab his wrist. A's reaction is to bring his hands close together. Since D is expecting just that, he helps A to achieve his purpose, then, with his left hand, D grasps A's left wrist. Now, D pointing the fingers of his right hand toward his own body, thrusts his right wrist in that direction, bringing his right forearm close to A's left forearm. The thinner upper part of D's wrist applies pressure against A's thumb and forefinger. By dropping the hips and extending the right forearm and fingers toward the direction of his own left knee, D breaks the hold. He then bends the knees and pivots leftward lifting at the same time A's left arm to expose A's side, against which he retaliates at will with a punch or an elbow jab. 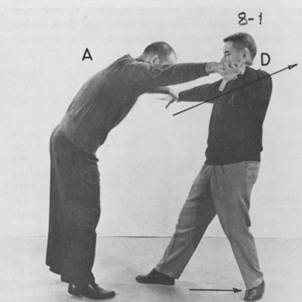 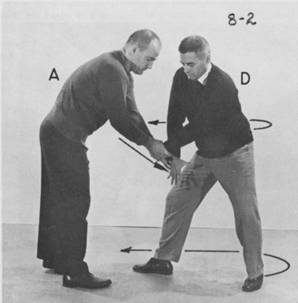
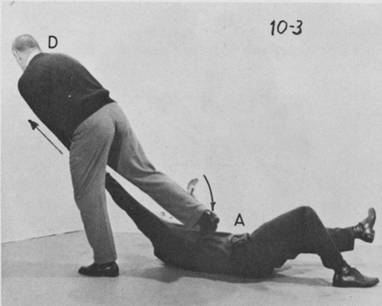
#9. Handshake. (Fig 9-1,2) A typical situation, where most likely, A does not mean any harm. He only gets to be nuisance, repeatedly trying to prove his strength by crushing D's hand. Obviously, there is no call for a kick to the shinbone: it would be way out of proportion to A's "attack" and intentions. D cups his right hand bringing his fingers as close together as he can, meanwhile faking a kick to A's shinbone. Upon A's reaction, D sets his right (kicking) foot under A's grip and takes a step with the left foot to A's right side. Then D brings the right foot behind the left in a wide arc. He is now close to A, facing the same direction. D, swinging his fully extended left arm in a wide circular motion from behind, he lets the side of his left hand drop essentially by its own weight, on A's right wrist: The aim is very easy: D does not even have to look, all he has to do is to think about touching his own right fingers with his falling left hand. D must not lift the right hand; he must keep both shoulders down, utilizing thus the longest trajectory available to him in order to develop maximum momentum. As D strikes, he slides to the right, away from A, and pulls his right hand out from A's grip. D should not bend at the waist while performing this technique. 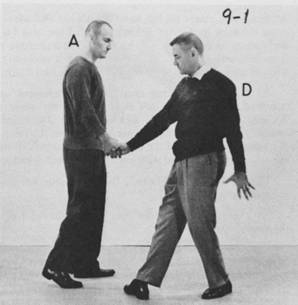 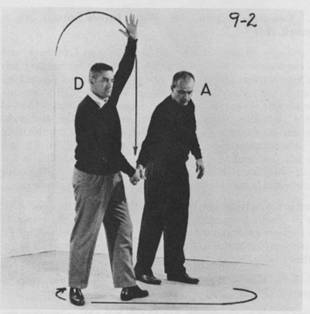 #10. Handshake with Pull. (Fig. 10-1, 2, 3) A has grabbed D's right hand and is giving it a sharp pull. D relaxes, and goes along with the pull, hips leading. He jumps forward bringing his left foot near and to the outside of A's right foot. D kicks A's right shinbone with his right foot, and continues with his forward momentum. D passes under A's right arm and finds himself behind him, still maintaining what was initially A's grip. Now, D lifts A's arm in a wide circle, over A's head, and places his left hand on A's left shoulder. D throws A on. the back by kicking behind A's left knee with his left heel, and pulling up and away with his body. The important point here is to pull with the body; if A's size makes it necessary, D takes a few short steps backwards in order to throw him down. As A hits the working area, D pivots leftward and, facing A's head, extends fully A's right arm in the same direction. A's side is now open for a kick which, at D's choice, may be severe, moderate, or mild. D may kick A on the ribs, or stomp A's armpit, or temple. Like practically all basic ASP maneuvers, this one may be followed with joint twisting techniques. This is the "Nape Throw", first technique requiring knowledge of breakfalls. * A knee lift to the groin may be used instead of a kick to the shinbone. NOTE: lT lS PERHAPS Pertinent TO EXPLAIN WHY TEN TECHNIQUES ARE DEVOTED TO WRIST AND HAND GRIPS. THE REASON FOR THIS EMPHASIS IS THAT THESE ATTACKS ARE THE SIMPLEST AND THE BEST SUITED FOR TEACHING THE STUDENT THE USE OF THE FIVE PRINCIPLES ON Which ALL ASP RESTS. 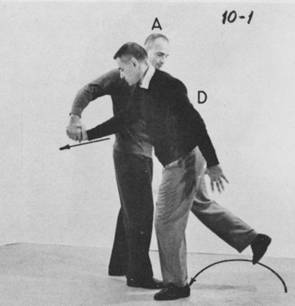 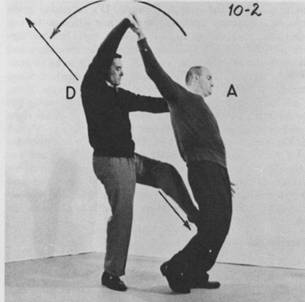
|
|
Send mail to
garycook1@windstream.net with
questions or comments about this web site. |