 The
American Self Protection Association, Inc.
The
American Self Protection Association, Inc.
Home of America's first Mixed Martial Art Training Method for the Entire Family
Brown II
![]()
![]()
![]()
![]()
|
Home of America's first Mixed Martial Art Training Method for the Entire Family Brown II
|
|
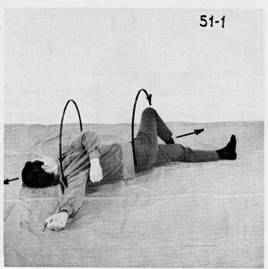
| 9.0 BROWN BELT SECOND GRADE PROGRAM Requirements: All the previous, plus the Psychosomatic Exercises, Techniques #51-62. PURPOSE OF THE PROGRAM: To introduce the student to the mind-body coordination exercises (psychosomatic) and to the basic elements of Stickfighting A.S.P. PSYCHOSOMATIC A.S.P. EXERCISES: "Calmness should be investigated in a place of turmoil." A Chinese Garden of Serenity by Hung Tsu-ch eng (Ming Dynasty) translated by Chao Tse-Chiang, 1959. THESE EXERCISES ARE AN INTEGRAL PART OF SELF-PROTECTION, SINCE THEY HELP TO MINIMIZE STRESS AND EMOTIONS, WHICH ARE INHERENT TO ANY KIND OF CONFRONTATION. IT WOULD BE A SERIOUS MISTAKE TO CONSIDER THEM OF SECONDARY IMPORTANCE. EVEN WHEN NOT ATTACKED, ONE HAS STILL TO LIVE WITH HIMSELF EVERY DAY OF HIS LIFE. In today's troubled world, mental patients outnumber all others. Few would not recognize the great need for preventive mental hygiene. Yet many ignore the importance of the mind-body relationship in maintaining personal health, physical, emotional, as well as mental. Science has not yet understood the precise relationship between mind and body. There is no doubt that there is a very close one and that heavy penalties are to be paid when we do not keep it in good order. THIS IS THE LEADING CAUSE FOR PEOPLE SEEKING ESCAPE FROM REALITY IN ALCOHOL AND DRUGS. But it is all very personal and only our own experiences will tell us if we are on the right track. One person may feel good physically and mentally after exercising strenuously, while another may require something different to achieve the same result. The Socratic "know thyself is challenging, but essential in understanding our experiences and our relationships, as well as for our guidance in life. The term psychosomatic is derived from the Greek psyche (mind, soul) and soma (body). In the following few exercises we are dealing with three important areas of the mind-body relationship, namely, relaxation, breathing, and balance. None can be ignored in daily life without adverse effects. Psychosomatic exercises may be practiced at home, without any special equipment by any reasonably healthy person. The results obtained in terms of well-being by practicing psychosomatic A.S.P. are far beyond what might be expected from the required effort. One may practice anywhere, wherever convenient, however, for our purpose we have assumed that these exercises will be practiced first thing in the morning as one wakes up and is still in bed. Exercises marked with a "B" (Table 1) lend themselves to such variation. Those selected for night practice are indicated with an "N" and a number suggesting a sequence. Psychosomatic A.S.P. should be practiced with tenacity, albeit with detachment and without any anxiety concerning results. These will come soon enough. Tenacity without anxiety is the key to success. Negative feelings such as worry and anxiety always work against us and prevent us from achieving another important requirement, concentration. It may surprise some that concentration is not achieved by thinking hard about a given subject, but by thinking about it to the exclusion of everything else. Putting it differently, we concentrate on a given subject by keeping it alone in our mind and not by forcing it there among other things. For instance, if we want to concentrate on relaxation, we shall succeed in doing so by eliminating from our thoughts everything creeping in that is not relaxation. Since our mind cannot remain empty for very long, relaxation will be the only subject to occupy it. You must perform all exercises with concentration. The ability to concentrate has many beneficial results. Among others, it helps us exclude from our mind negative thoughts such as anger, fear, envy, revenge. Either we control our thoughts, or they control us. Negative thoughts adversely affect our lives and our health, while good, hopeful, kind thoughts have a healing effect. Forgiving is always better than holding a grudge, because it frees our mind from a destructive burden. We hurt ourselves more than the person who has angered us. While sometimes forgiveness does not seem to be in order, it is usually the better course. This is true for all negative feeling and thoughts. Concentration helps us to exclude from our minds those that can harm us. WHEN A THINKING MAN BECOMES AWARE OF HIS EXISTENCE AND FATE AS A HUMAN, HE KNOWS THAT HE HAS ONLY ONE REAL CHOICE: TO LIVE AND DIE WITH DIGNITY, WHILE REMAINING TRUE TO HIMSELF, NO MATTER WHAT HIS RELIGIOUS BELIEFS MIGHT BE. THE DIGNITY THAT HIS ABILITY TO THINK CONFERS HIM, NOTHING AND NO ONE CAN DEPRIVE HIM OF, UNLESS IT DESTROYS SUCH ABILITY. #51. Stretch and Twist (Fig. 51-1) Lying on your back, extend your arms above your head, while stretching your body, toes curled up and heels pushing out. Push your hips in the direction of the heels, so that one leg stretches longer than the other, in alternation. Do this for a least five seconds, yawning hard at the same time. Then go limp. Repeat once more. Now bring the arms alongside the body, fingers curled in, wrists bent upwards and repeat with shoulders and hips the same motions as previously. Finally, turn the shoulders in one direction, while gently twisting and stretching the hips and head in the opposite direction as you are crossing one leg over the other. Same duration as the first part of the exercise. A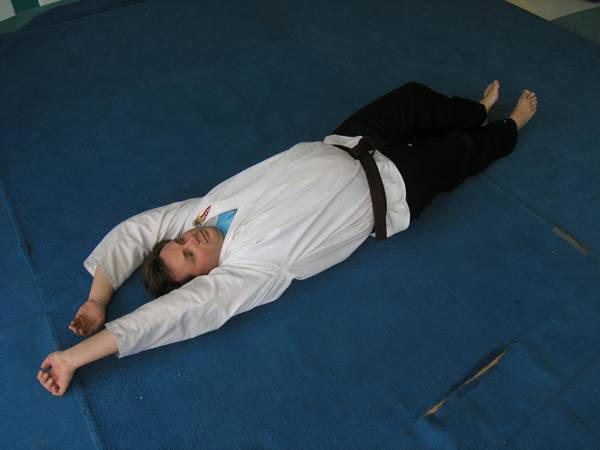 B B
 C
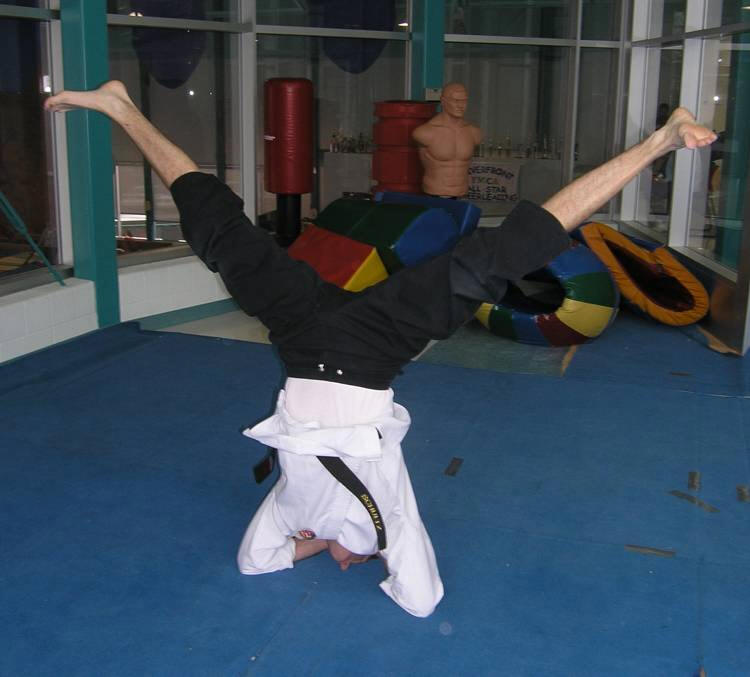
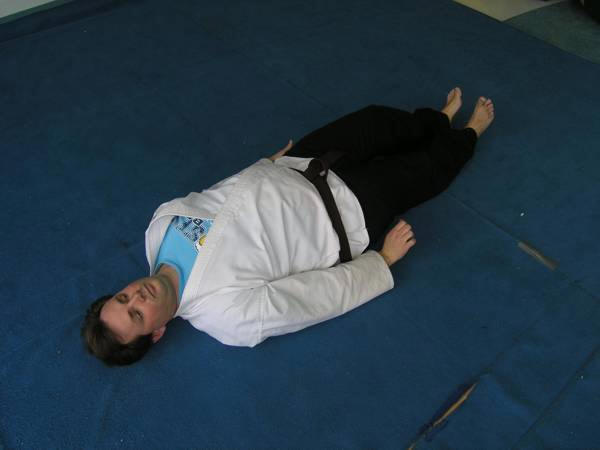
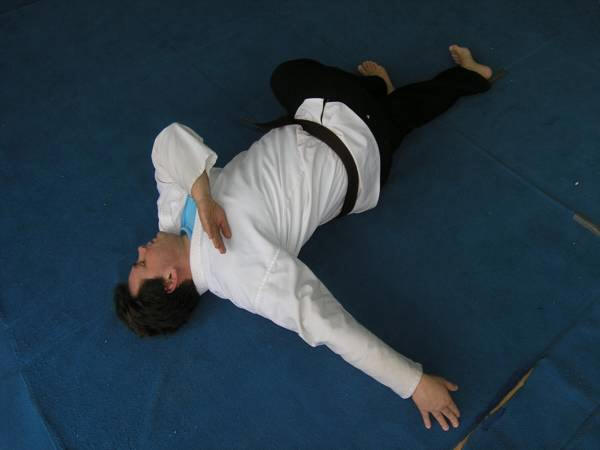
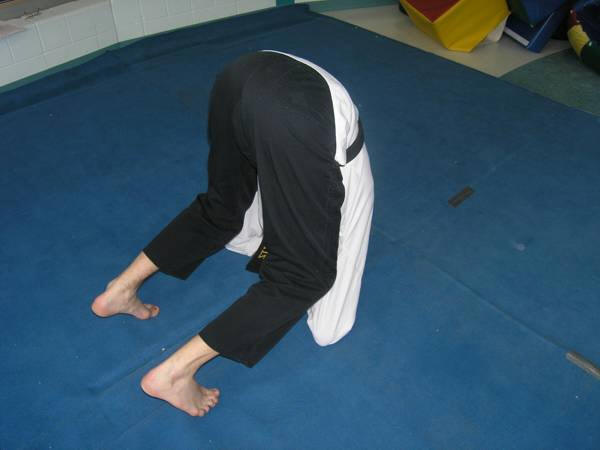
#52. Concentration-Relaxation The detailed instructions below are meant to help beginners. With practice, you can relax at will. As you are lying in bed, put a pillow under your upper thighs. Keep your body straight, with its weight evenly distributed. Otherwise, some unbalance will occur, which is always accompanied by some muscular tension. You must feel comfortable. Now place your hands, palms down, on either side of the groin and take three deep breaths as an introduction to calm breathing essential to relaxation. Then, look at a point on the ceiling, address yourself by your name, saying: " you are going now to relax for 15 minutes; after that, your muscles will come back to their normal tone and you will feel wonderful and rested". Close your eyes and say to yourself: "I am now breathing deeply and calmly, I am relaxing". Make no effort to control your breath, let it be calm and natural. Throughout the exercise, keep your eyes closed and direct effortlessly your gaze in the general direction of the tip of your nose. This will help you concentrate by slowing down wandering thoughts, since closed eyes tend to wander with them. Now start relaxing muscular groups in the following order: Muscles of the scalp. Say: "I am relaxing now the muscles of my scalp. The muscles of my scalp are completely relaxed". Wait a couple of seconds. Then proceed similarly with the muscles of the forehead, then with those around the eye sockets. The latter are a key group, which must be carefully controlled. Then, proceed with the muscles of the cheeks, the jaw (key group) and the back of the neck (key group). Let your jaw hang loose so that the tips of the upper teeth touch the upper part of your lower lip; thus, you will breathe through the nose, your throat will not dry up, and you will relax your jaw easier. Now you have completed the relaxation of an important area: your head and neck. Visualize that somebody is lifting your head from the bed and then lets go of it: your head falls back on the bed like lifeless. From now on, we shall refer to this process as "lifeless visualization." It helps very much in achieving relaxation. During all this time your breathing is kept even and calm. Continue with the upper left arm, the forearm, the hand (key group), then proceed with "lifeless visualization" of the left arm, as before. Continue with the right arm, the abdomen, the hips and small of the back (key group), then the legs, each time ending with "lifeless visualization." Now visualize your whole body as being lifted and hanging like a rag doll. As a help to keeping your mind from wandering, either repeat the sequence, or keep repeating to yourself: "My mind is blank and my body is relaxed" at the calm rhythm of your breathing. You will go through various stages of relaxation, as you will discover. With practice you can reach the stage of complete relaxation. When your skeletal muscles start relaxing, you will feel rather uncomfortable: they are so used to being tense that you will feel them twitching and restless. Don t give into the temptation to get it over with. After a time, you will go through the second stage of the relaxation process and you will feel your body getting heavy; if at this stage you want to move any muscle, it will take a fraction of a second before its normal tone is restored. In the third stage of relaxation, you will feel very light, like floating on a cloud, and you will be able to control to some extent involuntary muscles. It is a wonderful sensation. It takes some practice to reach that stage, but it is well worth the effort. Keep in mind that it is very unlikely that you will be able to relax sitting or standing, if you do not master first relaxation in the lying position. It must be stressed that relaxation is different from sleep. One may sleep without being relaxed muscularly. It is well known that tired soldiers can sleep standing and even marching. Mastering relaxation will allow you to go to sleep, but only when you so desire. Again, the technique given here is meant to be helpful to beginners. With practice one can relax without going through all the previous steps. #53. Abdominal Contraction Next exercise involves the muscles of the diaphragm and other muscles involved in breathing. Contract your abdominal muscles slowly and steadily, as if you wanted to have your abdomen touch your spine, while exhaling completely and bringing your loins and back in contact with the work area. Keep this position for seven seconds counting slowly, one-second, two-seconds, etc. Let your muscles return to normal slowly, and ONLY THEN INHALE. Repeat this cycle at least twice. #54. Mock Breathing It is similar to the previous exercise, except that when your abdominal muscles come back to the normal position, you do not inhale, but you expand the chest to the maximum, AS IF YOU WERE BREATHING IN. Hold this position for seven seconds, then let air rush in. Repeat a minimum of four times. This exercise is meant for the diaphragm and the thoracic (rib cage) muscles involved in breathing. #55. Rhythmic Breathing (Fig. 55-1,2) Stand at ease, well in balance, and exhale slowly, as completely as you can for the count of 10 seconds. Pull in the abdomen at the start of the count, and at the end lower shoulders and head. Hold this position for 2 seconds, then inhale freely, but relatively slowly at your own comfortable pace. DO NOT ATTEMPT TO CONTROL YOUR BREATH at this stage. Breathe in completely, straightening shoulders at the start, and pushing the abdomen out for maximum capacity at the end, head leaning back, palms facing out. Lock in your breath while expanding the diaphragm; hold it for 20 seconds, without forcing; then exhale for the count of 10 seconds. This cycle is repeated ten times in full concentration. If this is hard at the beginning, cut all counts by half and work up, gradually, to the indicated length. Never force yourself. Repeat a minimum of ten times in full concentration. When this becomes easy, make it more difficult by increasing the counts, for example, 12 exhaling, 24 holding. The count of 2 after each exhalation does not have to be altered. Finish the exercise by exhaling completely, while pulling your abdomen in, bending at the waist and folding your arms tight on the chest, hands on shoulders. Thus, you expel most residual air from your lungs. Stay in this position for a count of 7 seconds, then unfold your arms, relax, and inhale, while taking the erect posture. Repeat at least twice, switching the relative position of the arms each time, the arm that was on top comes now under. Thus, each of your lungs gets, in turn, maximum compression. Practice outdoors, whenever possible. 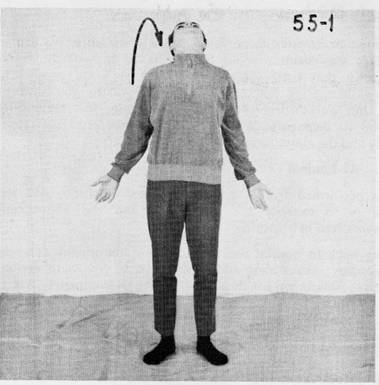 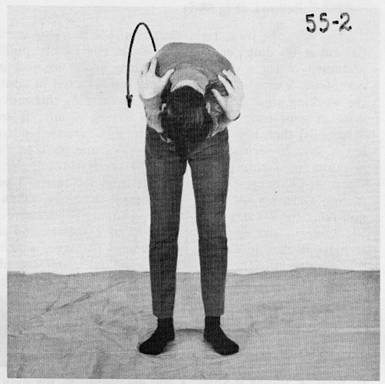 #56. The Reed (Fig. 56-1) Lie flat on your back, lift up your legs straight and roll as far back as you can without rolling over. Place your hands, palms down, one on top of the other as far up as possible between your back and the work area. STAY in this position for 10 seconds, then rock your legs gently in the direction of your head, back and forth, heels jutting out, as explained in #51 for another 10 seconds. Then, swivel the hips parallel to the work area, from right to left and vice-versa for the same count. You must feel a massaging action on the spine. Now, slide the hands lower by a couple of vertebrae and repeat. Continue until you reach the tailbone, taking an average of seven such changes to do so. At that time, throw the legs forward and sit up in one block, without pulling out your hands from behind your back. This exercise affords an excellent massage of the medium and lower spine. You may increase your counts at will after you have mastered the "Reed" as described. 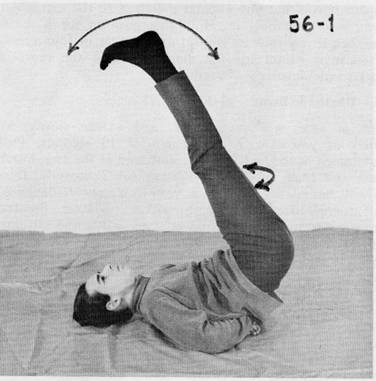 #57. The Locomotive (Fig. 57-1) This exercise stretches mainly the upper spine and complements the "Reed". Sit on the floor, roll on your back, chin on chest, and stretch gently trying to touch the floor with your toes. If you are not able to do this initially, do not force, but work gradually toward that goal. Reach as far as you can and stay there for 10 seconds. Then roll back into the sitting position and grab all your toes with the corresponding hands, elbows between the knees, which are bent so that the heels come close to the crotch. Extend your right leg and arm, as far as you comfortably can and then some. The arm resists the extension of the leg, while the head turns to the left, as far as possible. The right leg then returns to its initial position, and the left leg is extended as the head turns to the right, as far as possible. This is repeated a minimum of five times for each leg, the fingers holding always the toes. Then both legs are extended and the head is bent forward, so that the chin touches the chest. This position is held for 10 seconds. 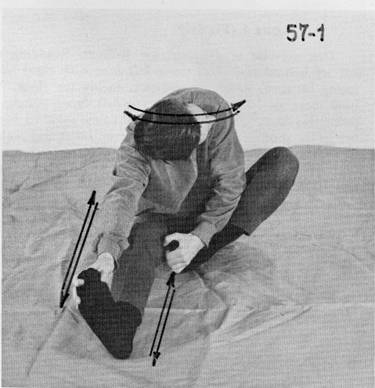 #58. The Bellows (Fig. 58-1) Lie on your face, right cheek on the work area, palms flat on it, near the shoulders. Exhale completely, pulling your abdomen in for a count of ten; then inhale as you push up, arms completely extended. The lower thighs, hips relaxed, are in contact with the work area. The inhalation accompanying this motion is done at your own rhythm (for example, it could last 3 seconds). Then, hold your breath for, let us say, 20 seconds. Exhale as you return to the initial position for a count of 10 seconds (20:2); this cycle is repeated at least six times, the head turning alternately to the right and left. Upon completion, bring your arms alongside the body, palms up, and relax for 2—3 minutes, breathing calmly. This exercise induces an excellent abdominal massage, which can be made even more efficient by inserting a pillow under the abdomen, and bends the spine in the opposite direction as exercises #56 and 57. The "Bellows" may be followed by a number of push-ups, at will, exhaling while pushing up and inhaling while coming down. Care must be taken that the rhythm allows thorough exhalations. A good target is one hundred such push-ups, followed by relaxation as above.  #59. Figure 4 (Fig. 59-1) This exercise is designed for balance. Standing up, bend your left leg behind your right and grab the instep of the left foot with the right hand, palm facing forward. The left hand dangles relaxed alongside the body. You look now like a "4", more or less. The palms must face forward, because it helps to bring together the shoulder blades and expand the rib cage, allowing for a better posture and improved breathing. Stay in this position, stretching the spine, as straight as possible, for 30 seconds. Then, jump in place in a continuous supple fashion for 10 seconds. Repeat twice. Then switch feet. In this, as well as in the other exercises, notice that static and dynamic sequences alternate. A.5. P. is not confined only to static or dynamic situations, but deals with both. When you have mastered this exercise, repeat it with closed eyes. While this is somewhat more difficult, it is very beneficial for balance. Indeed, it allows you to find how good your balance is. When your eyes are open you can see reference points, which help you to continuously adjust your balance. This is impossible with closed eyes, and your balance becomes dependent upon your intrinsic sense of it and on your degree of relaxation. Concentrating on your center of gravity (a couple of inches below the navel) helps much to keep your balance with closed eyes.  #60. I and Y (Fig. 60-1,2) This exercise appears more difficult than it really is. Kneel down facing a wall. Cross your fingers on top and slightly to the back of your head and position it on the floor next to a wall. It is a good idea to use a thin cushion or rug. Now, take a knee-chest position and throw your legs up as for a forward roll (mean to roll). Your forward motion will bring your legs and back against the wall. Stretch your body straight up using the wall as support and stand on your head. Return to the knee-chest position by reversing the sequence. DO NOT GO ANY FURTHER BEFORE MASTERING THIS PART. Now, move the feet away from the wall and keeping the feet together in full extension, count 10 seconds; then, open them wide, so as to feel their weight bearing on the hip joint. Relax and hold for another 10 seconds. Rotate the feet from the ankles simultaneously in one direction, when your feet are together, and in the opposite direction when they are apart. In the first position you are looking like an "I" and in the second like a "Y". Alternate positions three times minimum, concentrating fully on the exercise. If this is too much for you, cut down time in half and work up to full time. Come down from the inverted position, bringing both legs together, stretched, as slowly as you can, moving the hips toward the wall in order to counterbalance their weight. Now, take again the knee-chest position and rock gently back and forth on the top of your head and knees, bringing the chin in contact with the chest each time you rock forward. Repeat ten times, then go limp. Extend arms, palms on the work area, chin on chest, stretch the spine by curving it as the cat does. Repeat three times then get up. This exercise calls for balance and relaxation, and demonstrates their important relationship to coordination. If your balance is not so good you will feel tense and the rotation of the feet will be difficult to coordinate. Also, if you do not use your hips properly to counterbalance the weight of the legs as they come down, you will not be able to do the last part of the exercise slowly, and your legs will drop fast. Learning to use the hips for balance is essential, since the center of gravity is located in the general lower abdominal area. Finally, this exercise improves the blood circulation in the brain. A note of caution: If your neck or head hurt as you practice this exercise, or if you feel dizzy, stop immediately. Try again another day until you master it, but only if your doctor approves. A C 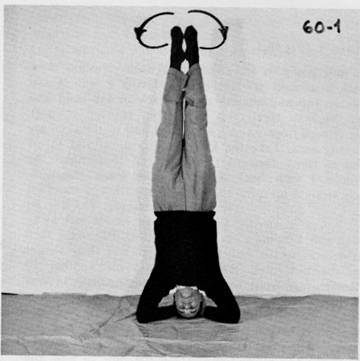 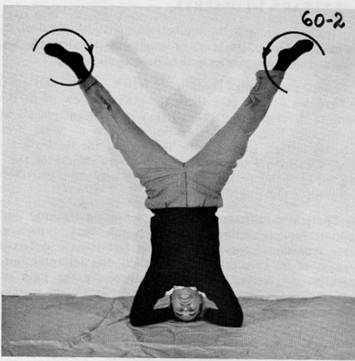 #61. Vibrator This is a dynamic relaxation exercise. Standing at ease, with weight equally distributed on the balls of your feet, shake your hands from the wrists, as fast as you can. The more relaxed you are the faster you will be able to shake. The result is a vibration transmitted throughout the body, which counteracts the buildup of muscular tension. Minimum duration: 30 seconds. #62. Water intake It is recommended to drink one or two large tumblers of water in the morning. Keep in mind that water requirements, as food requirements, have an important individual parameter. PSYCHOSOMATIC A.S.P. TABLE OF BASIC EXERCISES* #51 Stretch and Twist B N4 M #52 Relaxation-Concentration B N5 M SM #53 Abdominal Contraction B #54 Mock Breathing B #55 Rhythmic Breathing** B N3 M SM #56 Reed B M #57 Locomotive B M #58 Bellows B M #59 Figure 4 N2 SM #60 IandY N1 M #61 Vibrator N6 #62 Water Intake M SM
* Sequence may be altered **May be practiced in bed with minor adjustments. Arms are stretched on each side, palms facing up. Chin is lifted up at the end of breathing in, and lowered when breathing out. B May be practiced in bed N Night exercise; subscript indicates suggested sequence M Minimum series (8) SM Strict minimum series (4) BASIC STICKFIGHTING TECHNIQUES: Please refer to "Stickfighting: A Practical Guide for Self-Protection", by the author, Chas. E. Tuttle, Publishers, Tokyo, Japan 1983, pp. 1-89. STEP BY STEP PSYCHOSOMATIC A.S.P. EXERCISES: 51. STRETCH AND TWIST [Purpose: stretch spine]: A) Lay on back, toes up, heel forward, arms above head, fingers in and palm up. (see 51-1,A) B) Yawn hard and push hips down (right hip down & right palm up together, then left) C) Do above twice for 5 seconds D) Bring arms in, fingers in and palm up. (see 51-1,B) E) Yawn hard and push shoulders and hips down (right hip down and right palm down, then left) F) Do above twice for 5 seconds G) Cross one leg over the other (see 51-1,C) H) Look in the direction of the (up) leg I) Do twice for 5 seconds 52. CONCENTRATION-RELAXATION [Purpose: relaxation, concentration]: A) Place a pillow under your upper thighs B) Lay on your back keeping as straight as possible C) Place palms, face down, on either side of the groin (lap) D) Take three deep breaths E) Look at a point on the ceiling and say "'Name' you are going now to relax for 15 minutes, after that, your muscles will come back to their normal tone and you will feel wonderful and rested." F) Close eyes G) Say, "I am now breathing deeply and calmly, I am relaxing." H) Breath naturally I) Direct eyes to tip of nose to keep them from wandering J) Say, "I am now relaxing the muscles of the scalp, the muscles of my scalp are completely relaxed." K) Waite a few seconds L) Same as J. for the following 1. Forehead 2. Eye sockets (key) 3. Cheeks 4. Jaw (key) 5. Back of the neck (key) M) Lifeless visualization (Pick up and drop visually) (head) N) Same as L. continued 1. Upper left arm 2. Forearm 3. Hand (key) O) Lifeless visualization of left arm P) Same as L. continued 1. Upper right arm 2. Forearm 3. Hand (key) Q) Lifeless visualization of right arm R) Same as L. continued 1. Abdomen 2. Hips 3. Small of the back (key) 4. Legs with lifeless visualization as in O. and Q S) Visualize whole body being lifted and hanging like a rag doll
53. ABDOMINAL CONTRACTION [Purpose: work muscles of diaphragm and others]:
A) Lay on your back, hands in lap B) Contract abdominal muscles slowly and steadily toward the spine C) Straighten back so that there is complete contract with floor during exhale D) Hold exhale position for approximately seven seconds E) Relax muscles F) Inhale naturally G) Repeat twice
54. MOCK BREATHING [Purpose: work muscles of diaphragm and others involved in breathing]:
A) Same as A. through D. of 53 B) Expand the chest to maximum but don't inhale C) Hold for seven seconds D) Let air rush in E) Repeat 4 times
55. RHYTHMIC BREATHING [Purpose: lungs-maximum compression]:
A) Stand at ease B) Exhale slowly, as completely as you can for 10 seconds C) Pull in abdomen at the start, at the end, lower shoulders and head (see 55-2) D) Hold positions for 2 seconds E) Inhale naturally, straighten shoulders, head back, palms facing out (see 55-1) F) Hold breaths for 20 seconds G) Exhale for 20 seconds H) Repeat 10 times in full concentration I) Practice outdoors if possible. Cut time in half if necessary.
56. THE REED [Purpose: massage spine, stretch lower spine]:
A) Lie flat on back, lift legs and roll back as far as possible B) Place hands, palms down, one on top of the other as far up between your back as possible (see 56-1) C) Hold for 10 seconds D) Rock heels upward for 10 seconds as in 51. E) Swivel hips for 10 seconds F) Move hands towards lower back G) Swivel hips for 10 seconds H) Continue until you reach tailbone I) Roll forward and up without remaining hand from back
57. THE LOCOMOTIVE [Purpose: stretch upper spine-compliments the reed]:
A) Sit on the floor, roll back and touch floor with toes B) Hold for 10 seconds C) Roll forward into sitting position, grab toes (butterfly) D) Locomotive, head turn (see 57-1) E) Repeat 5 times for each leg F) Both legs out, stretch down, touch toes G) Hold for 10 seconds
58. THE BELLOWS [Purpose: abdominal massage and stretch]:
A) Lie on face, right cheek on work area, palm flat at the shoulders B) Exhale completely 10 seconds with abdomen C) Inhale as you push-up, arms completely extended (see 58-1) D) Thighs and hips stay relaxed and in contact with the work area E) Hold breath for 20 seconds F) Exhale and return to the start position, 10 seconds G) Repeat at least 6 times, head turns alternately right and left H) Upon completion, bring arms alongside body, palms up, and relax for 2 to 3 minutes. I) Could be followed by push-ups
59. FIGURE 4 [Purpose: balance]:
A) Bend left leg behind right, grab instep, palms outward (see 59-1) B) Palms are out in order to bring shoulder blades together and expand rib cage allowing for better posture and improved breathing C) Hold and stretch spine for 30 seconds D) Jump in place 10 seconds E) Repeat above twice then switch feet F) Repeat with closed eyes G) Concentrate on center will help
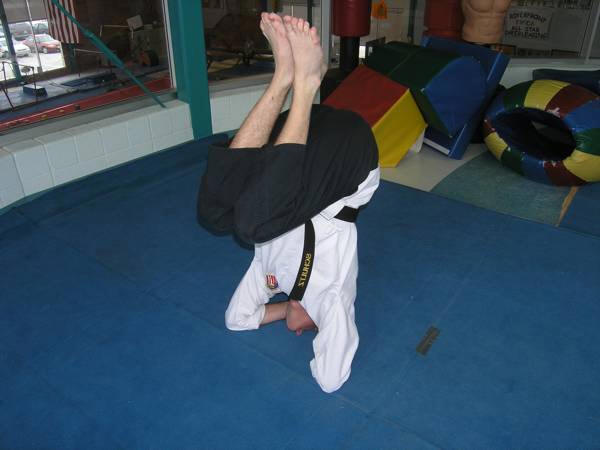
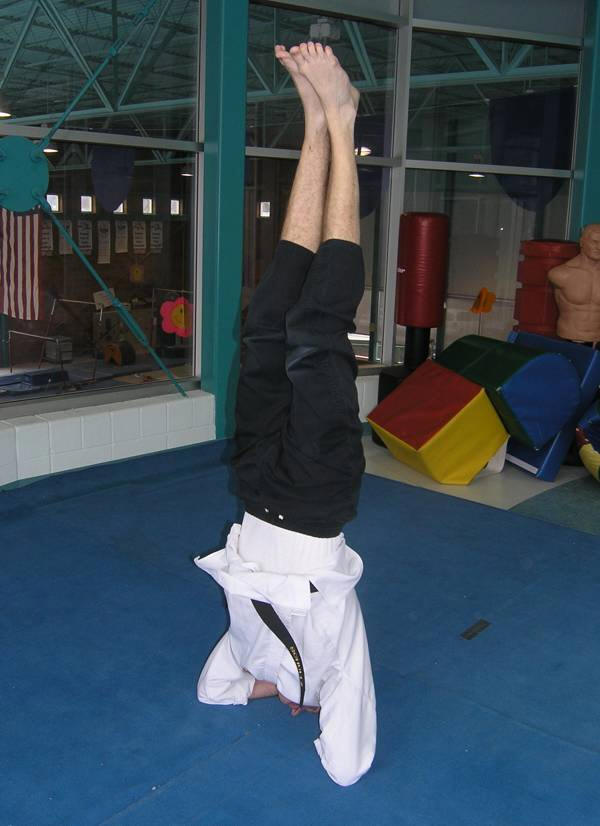
60. I AND Y [Purpose: balance and relaxation, blood circulation to the brain]:
A) I position against wall B) Away from wall, hold 10 seconds (rotate ankles) C) Spread legs apart and hold for 10 seconds (rotate ankles) D) Repeat 10 times (rocking motion) E) Repeat entire sequences 3 times
(see 60-1&2, A-E)
61. VIBRATOR [Purpose: relaxation]:
A) Standing at ease, with weight equally distributed on the balls of your feet B) Shake your hands from the wrists, as fast as you can. C) Hold for 30 seconds, entire body
62. WATER INTAKE:
A) Drink one or two tumblers in morning and night (several cups/day).
|
|
|
 B
B
 D
D
 E
E